
How to Print Barcode Labels in BillClap (Barcode Generator)
Print ready-to-scan barcode labels for your products straight from BillClap. With the Barcode Generator you pick a product, set how many labels you need, preview the full sheet and print it on A4 sticker paper or a label printer. You can choose from 9 barcode types and decide exactly what prints on each label.
Watch the video
Prefer to watch? See the full Barcode Generator tutorial (2:02) on YouTube: https://youtu.be/4lsrlU8CdH0
How it works
- Pick a product and enter how many labels you need.
- Add it to the list. Add as many products as you like to one sheet.
- Preview and print the whole label sheet.
Set up your sticker size, barcode type and label layout once in Barcode Settings, and every print after that matches your sticker paper.
Part 1: Add products to print
Step 1: Open the Barcode Generator
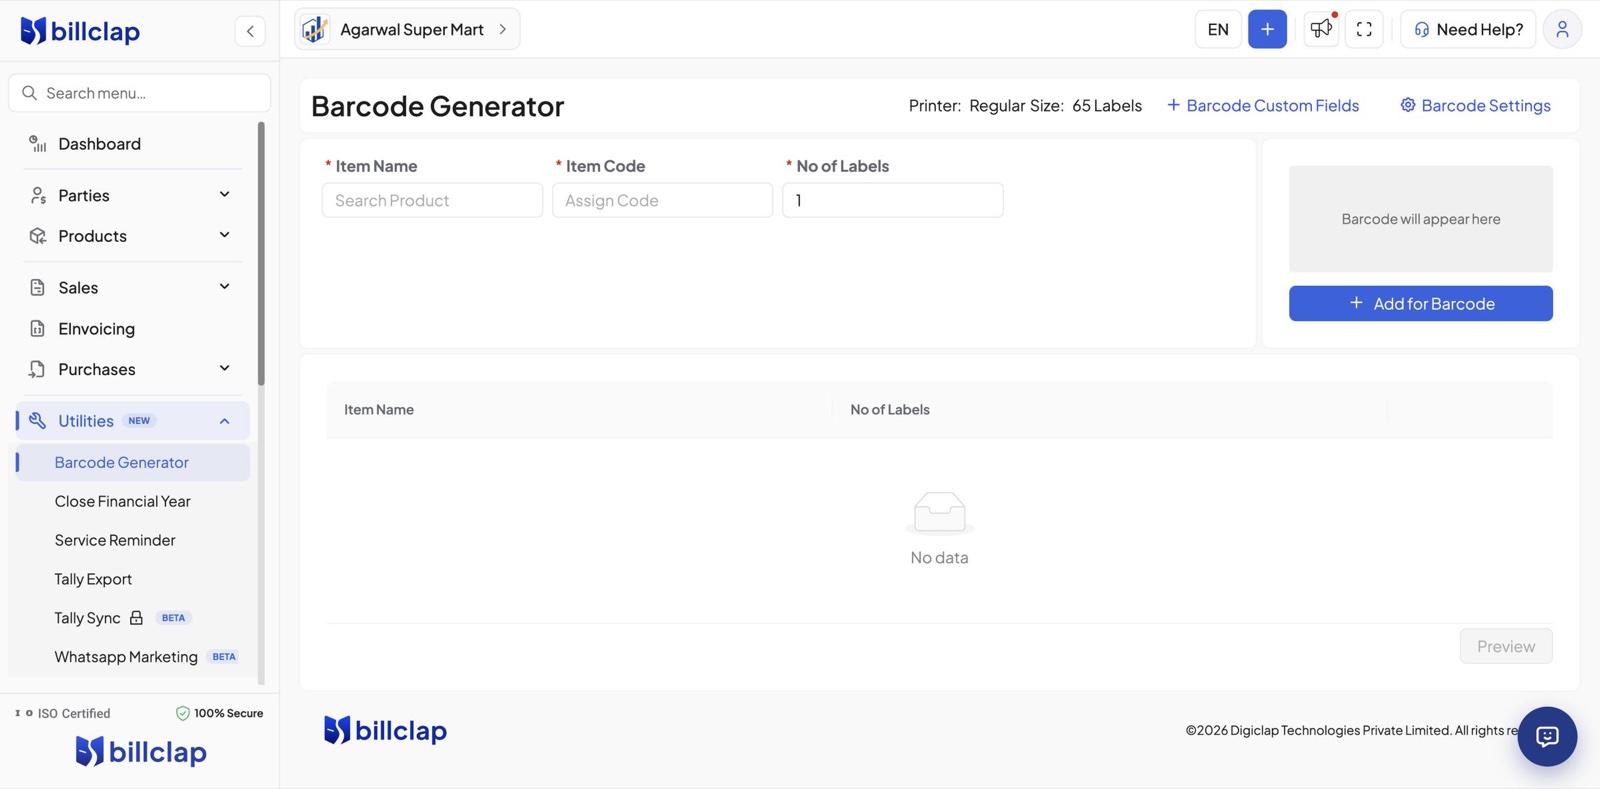
In the left menu, click Utilities, then Barcode Generator. At the top of the page you can see your current Printer type and label Size, for example Regular and 65 Labels.
Step 2: Search for your product
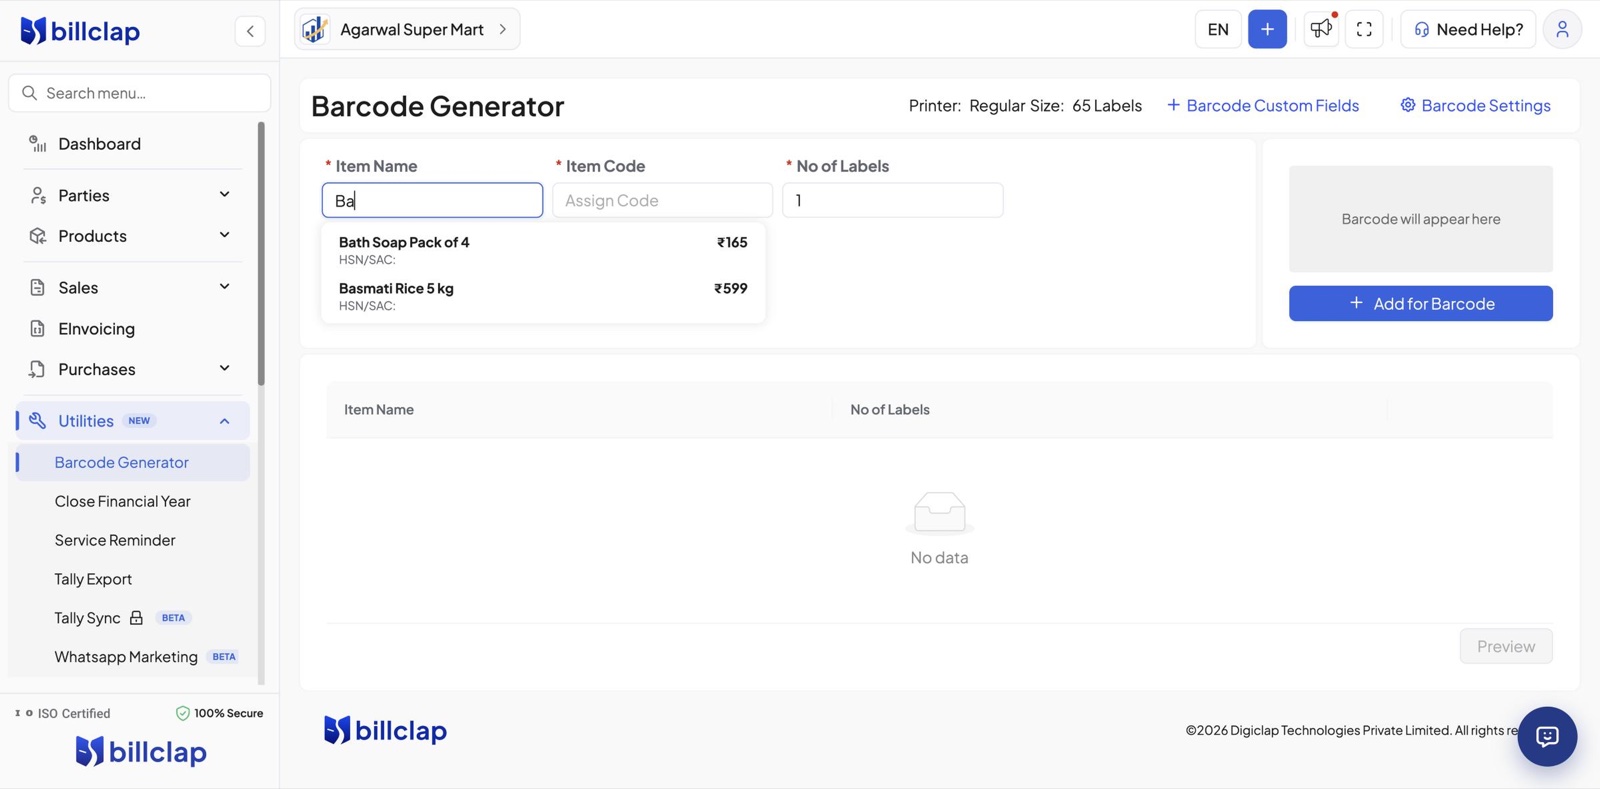
Click Item Name and type the first few letters of the product. Pick it from the list. For example, type Ba and choose Basmati Rice 5 kg.
Step 3: Check the code and enter the number of labels
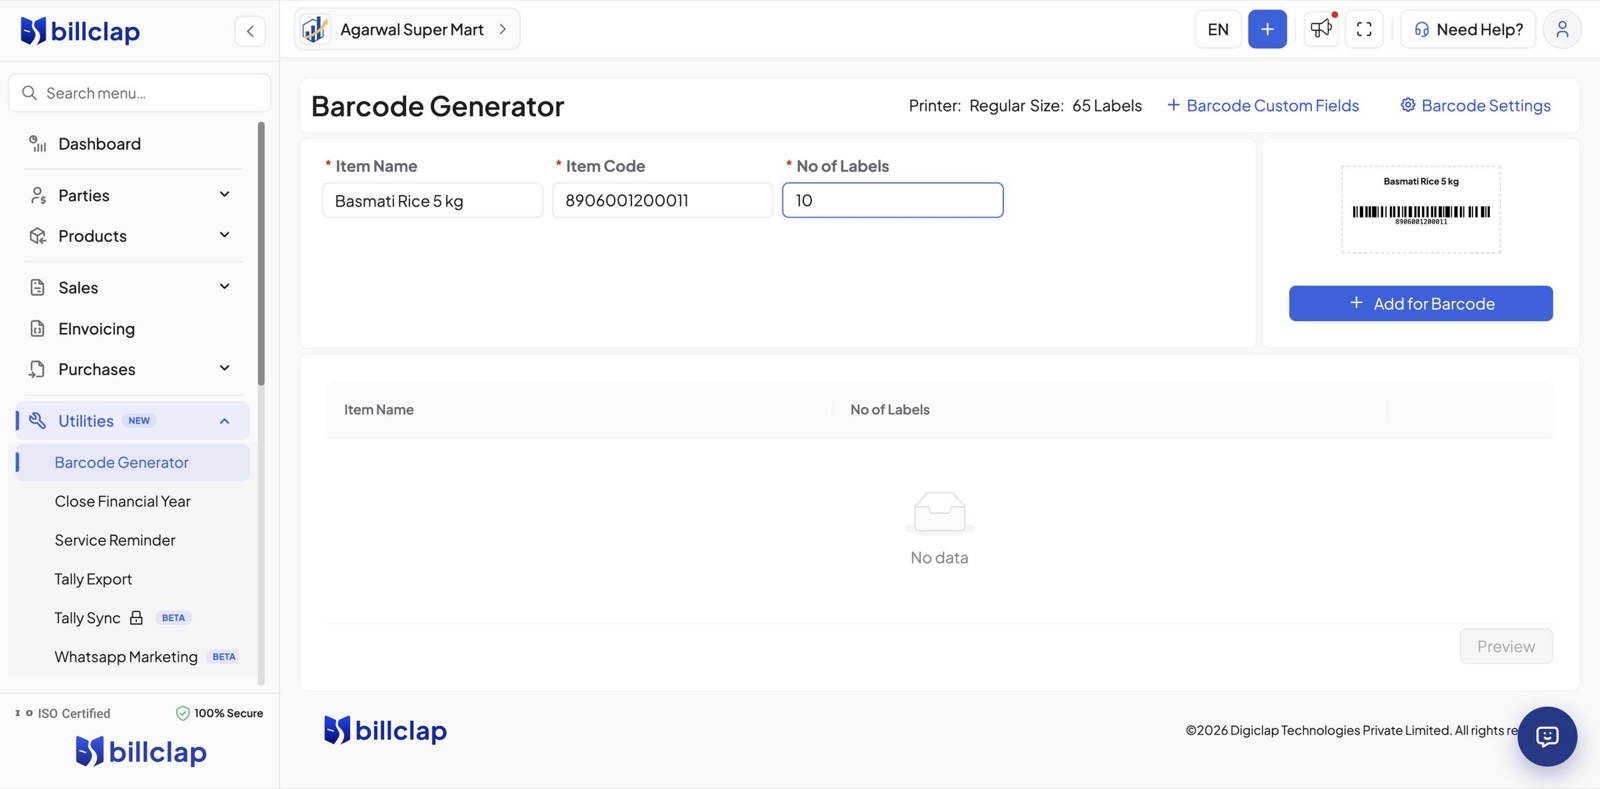
The Item Code fills in from the product, and a live barcode preview appears on the right. In No of Labels, enter how many stickers you need, for example 10.
Tip: If a product has no code yet, type one in Item Code. To save it on the product for next time, add it to the product itself under Products.
Step 4: Add it to the list
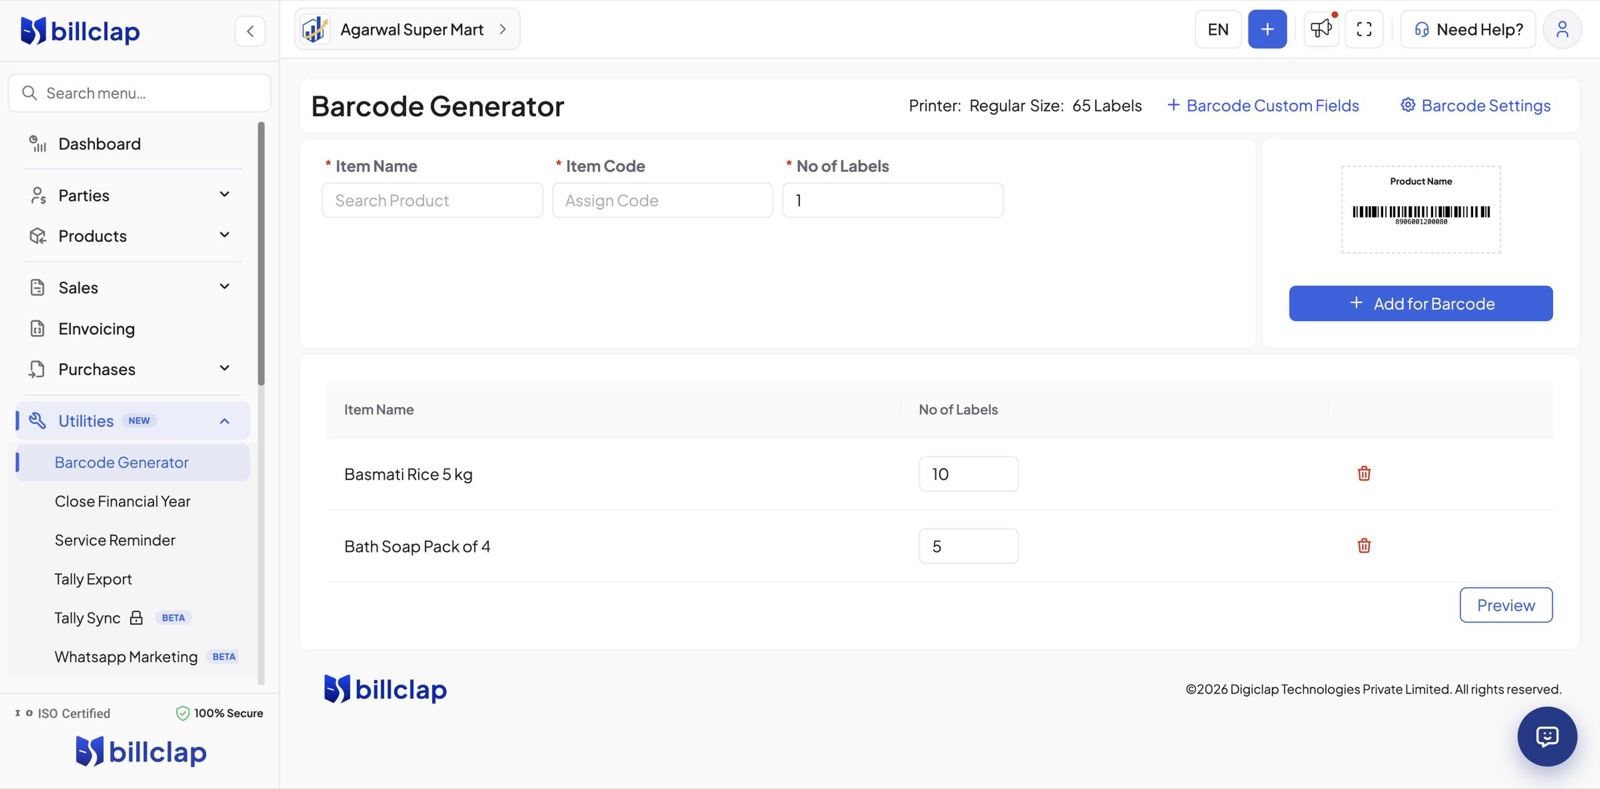
Click Add for Barcode. The product moves to the list below. Repeat Steps 2 to 4 for every product you want on the same sheet, for example Bath Soap Pack of 4 with 5 labels.
In the list you can change the number of labels in each row, or click the delete icon to remove a row.
Part 2: Preview and print
Step 5: Preview the label sheet
Click Preview. The Barcode Preview window shows every label in order. In our example that's 10 rice labels followed by 5 soap labels, 15 in total.
When it looks right, click Print.
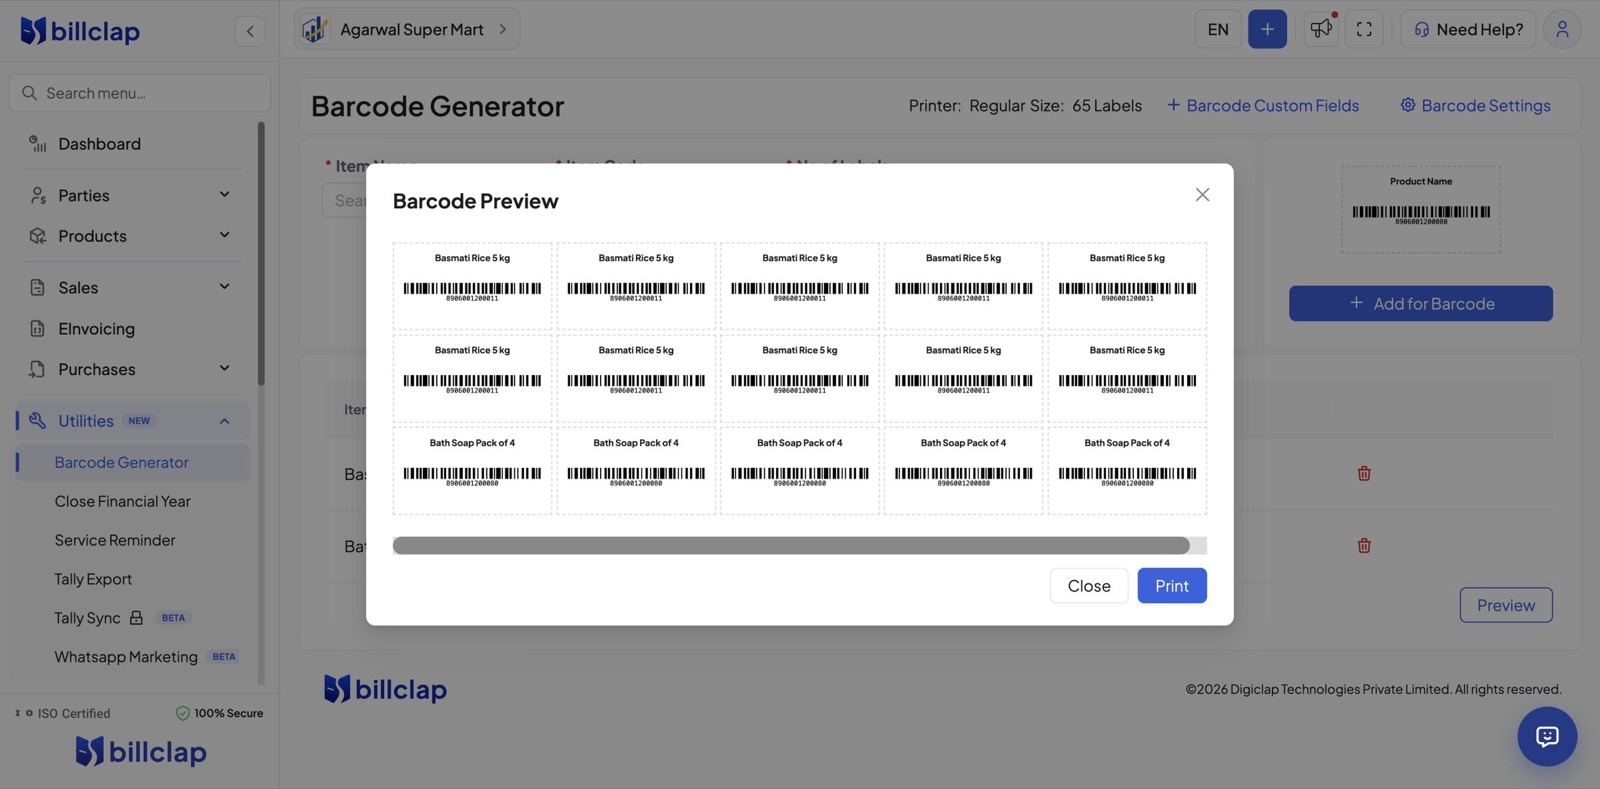
Tip: Before printing on sticker paper for the first time, do a test print on plain paper and hold it against your sticker sheet to check the alignment.
Part 3: Match your sticker paper
Step 6: Open Barcode Settings
Click Barcode Settings at the top right of the Barcode Generator page. Choose:
- Barcode Type: the barcode format to print (see Step 7).
- Printer Type: Regular Printer for A4 sticker sheets, or Label Printer for a roll label printer.
- Label Size: the sheet layout printed on your sticker pack, for example 65 Labels (38*21), 48 Labels (48*24), 24 Labels (64*34) or 12 Labels (100*44).
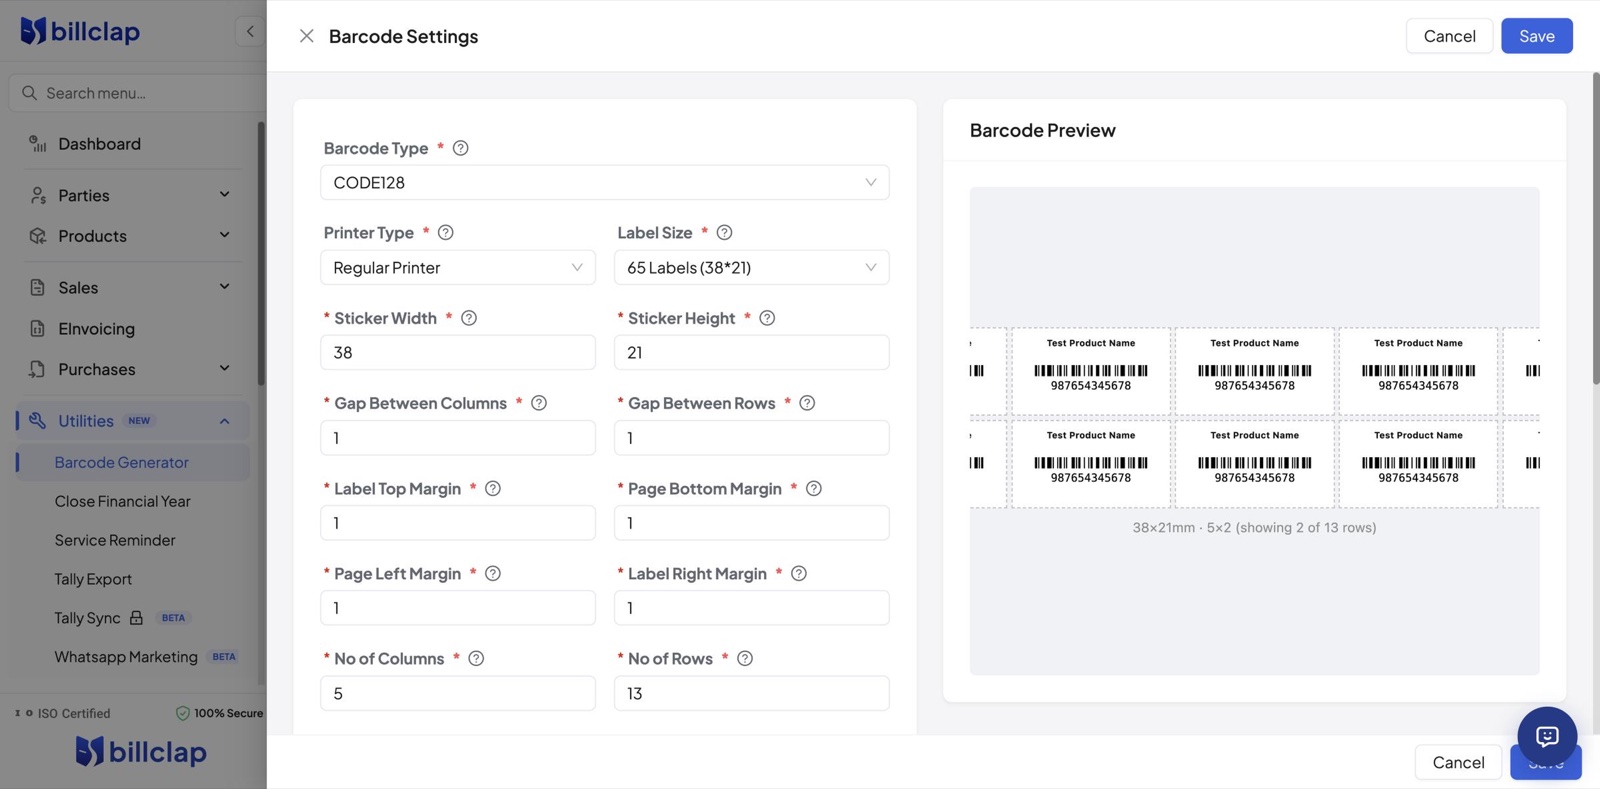
To fine-tune, adjust Sticker Width and Sticker Height, the gaps between columns and rows, the page and label margins, and the No of Columns and No of Rows. The Barcode Preview on the right shows how the sheet will look. Click Save when you're done.
Step 7: Choose a barcode type
BillClap supports 9 barcode types. Open the Barcode Type list and pick the one your scanner or supplier needs:
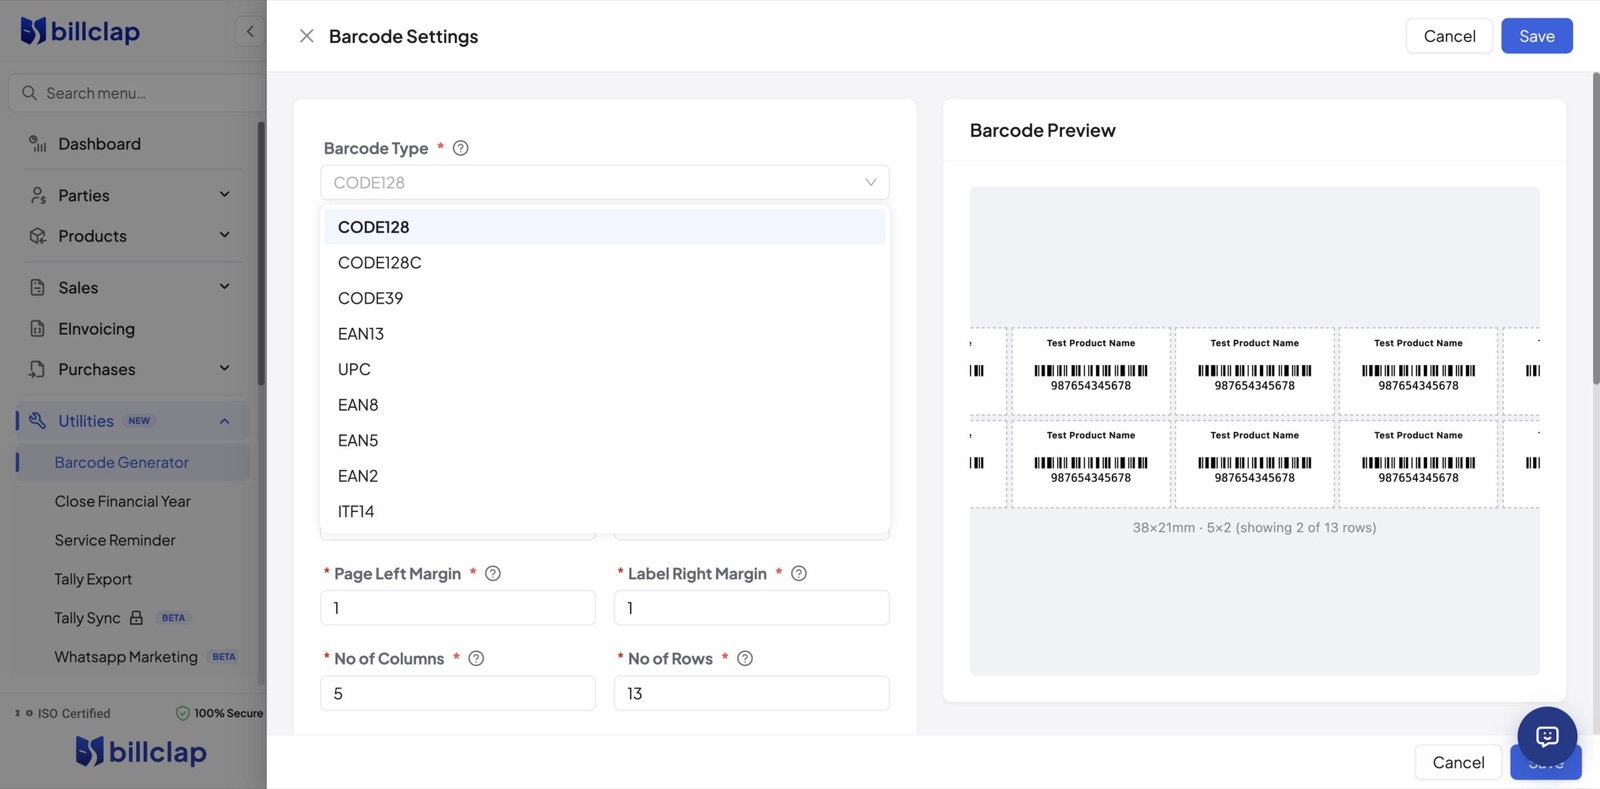
| Barcode type | Commonly used for |
|---|---|
| CODE128 | The default. Works with letters and numbers, and most scanners read it. A good choice for your own item codes. |
| CODE128C | A compact version of CODE128 for codes made only of digits. |
| CODE39 | Older standard that takes capital letters and numbers. Used by some older scanners. |
| EAN13 | The 13-digit barcode printed on most retail packs in India. |
| UPC | 12-digit retail barcode, common on imported products. |
| EAN8 | 8-digit version of EAN for small packs. |
| EAN5 and EAN2 | Short add-on codes, for example for an issue number or price. |
| ITF14 | 14-digit code for cartons and outer cases. |
The preview changes as soon as you pick a type. Here is the same sheet with EAN13:
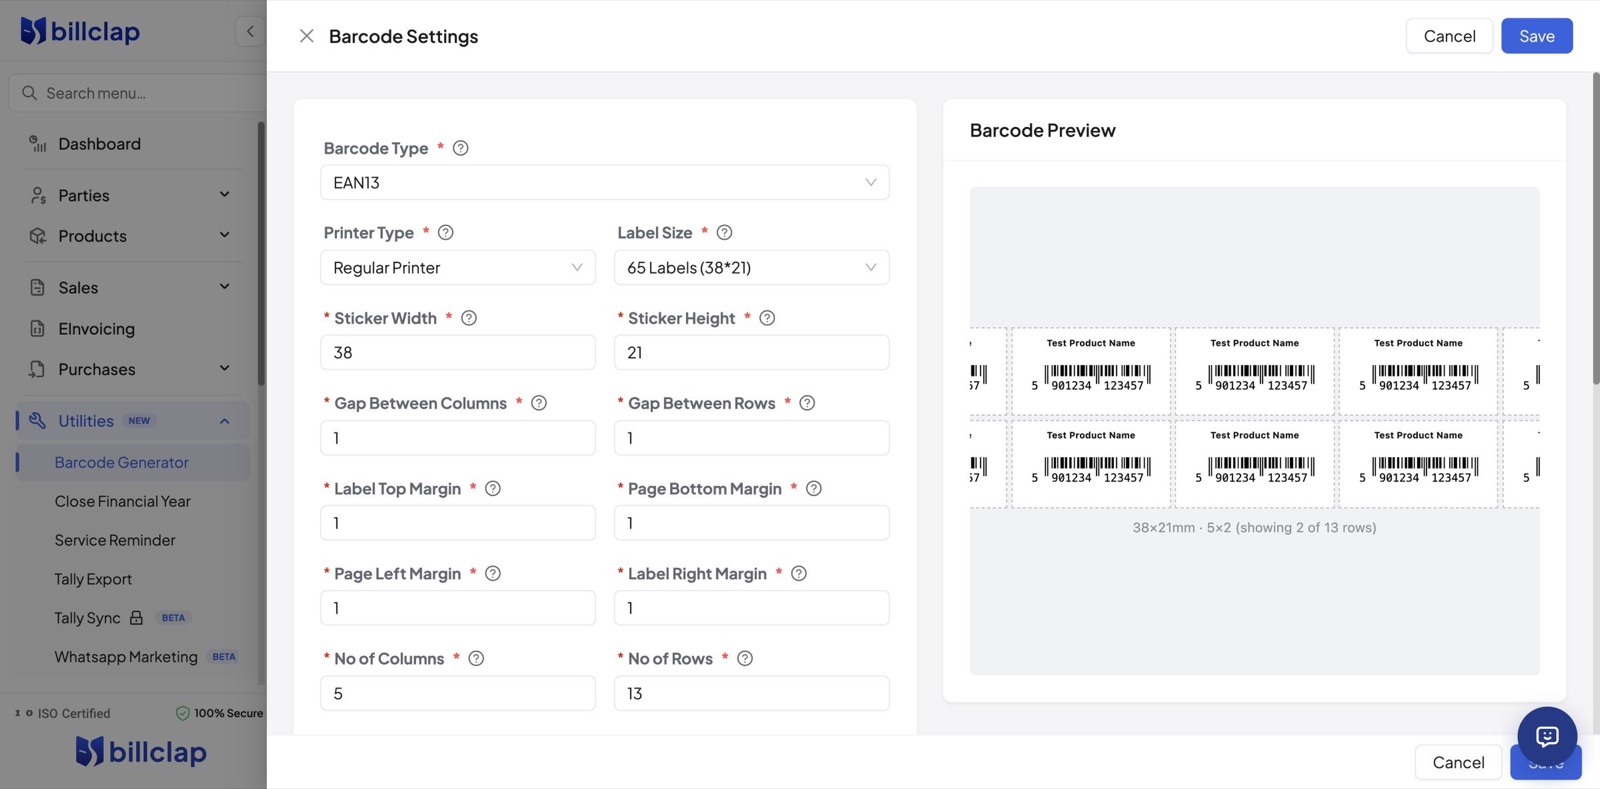
Note: EAN, UPC and ITF types only accept codes with a fixed number of digits and a valid check digit. If your item code doesn't fit, the label shows no barcode. Use CODE128 if your codes vary in length or contain letters.
Step 8: Choose what prints on the label
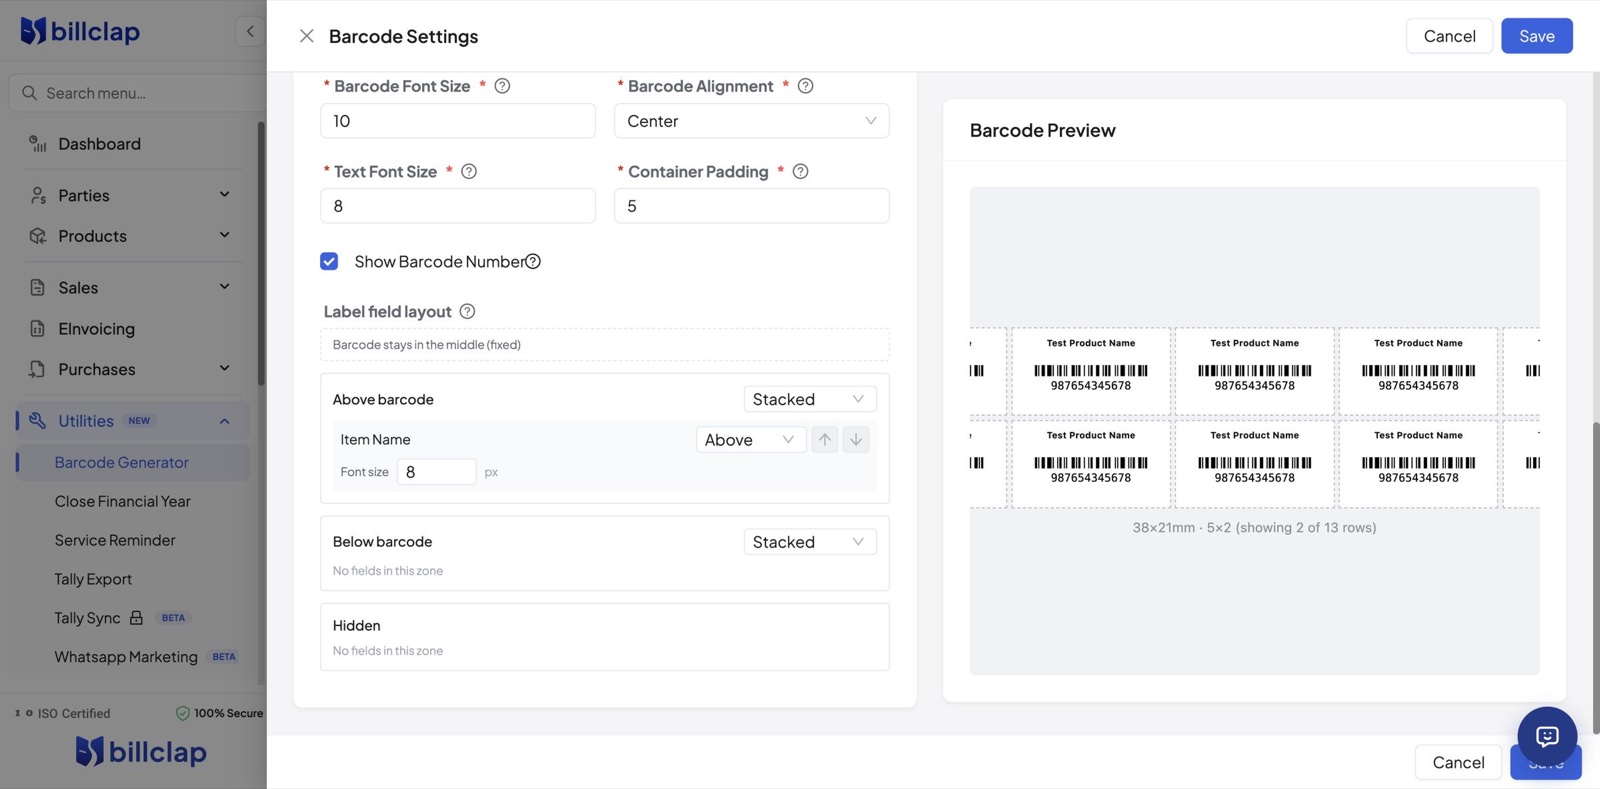
Scroll down in Barcode Settings to Label field layout. The barcode always stays in the middle. For each field, such as Item Name, choose whether it prints Above or Below the barcode, or is Hidden, and set its Font size. Tick Show Barcode Number to print the number under the bars.
Step 9: Add more details with Barcode Custom Fields
Need size, MRP or an expiry date on the label? Click Barcode Custom Fields at the top of the Barcode Generator page. In the Barcode tab, click New Custom Field to add your own, or pick a recommended one: Size, Model, Mfg, Exp or MRP.
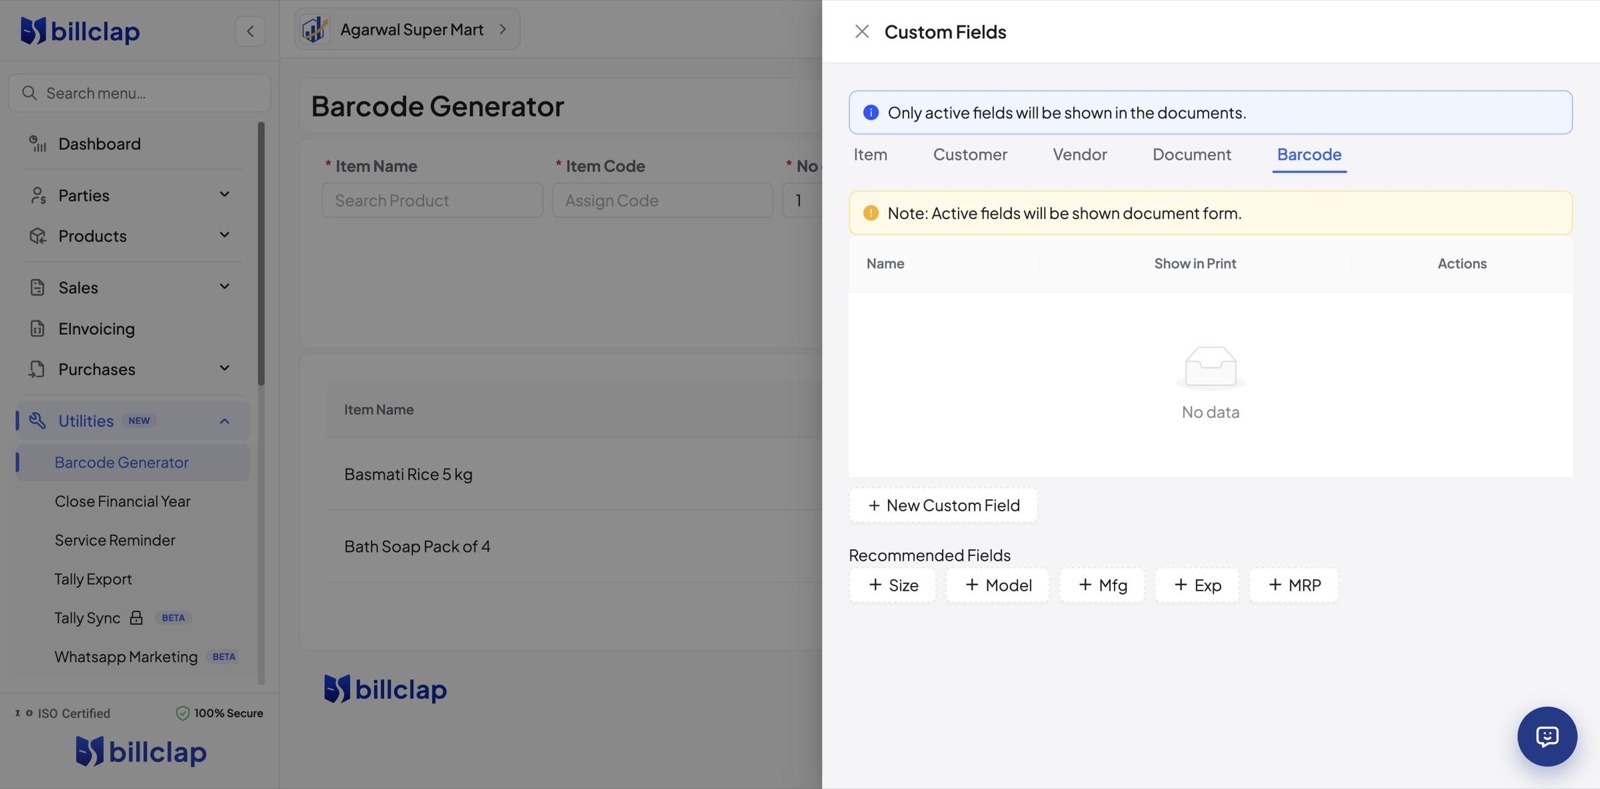
Only active fields are shown on your labels.
Frequently asked questions
Which label size should I choose?
Check the pack of your sticker sheets. It usually says how many labels are on one A4 sheet and their size in millimetres, for example 65 labels of 38 × 21 mm. Pick the matching Label Size in Barcode Settings.
Can I print barcodes for many products at once?
Yes. Add each product with Add for Barcode. They all print on the same sheet, in the order of the list.
Why is one of my labels blank?
The selected barcode type probably doesn't accept your item code. EAN13, UPC, EAN8 and ITF14 need an exact number of digits with a valid check digit. Check it in the Barcode Preview, and switch to CODE128 if your codes vary in length or contain letters.
Can I use these barcodes for billing?
Yes. Connect any USB or Bluetooth barcode scanner to your computer, open POS, and scan the label to add the product to the bill.
Do I need a special printer?
No. Any regular printer works with A4 sticker sheets. If you have a thermal label printer, choose Label Printer in Barcode Settings.
Need Help?
Our support team is available:
- 📞 Call/WhatsApp: 8882468190
- 📧 Email: support@billclap.com
- 🕐 Support Hours: Monday to Friday, 10 AM – 6:30 PM