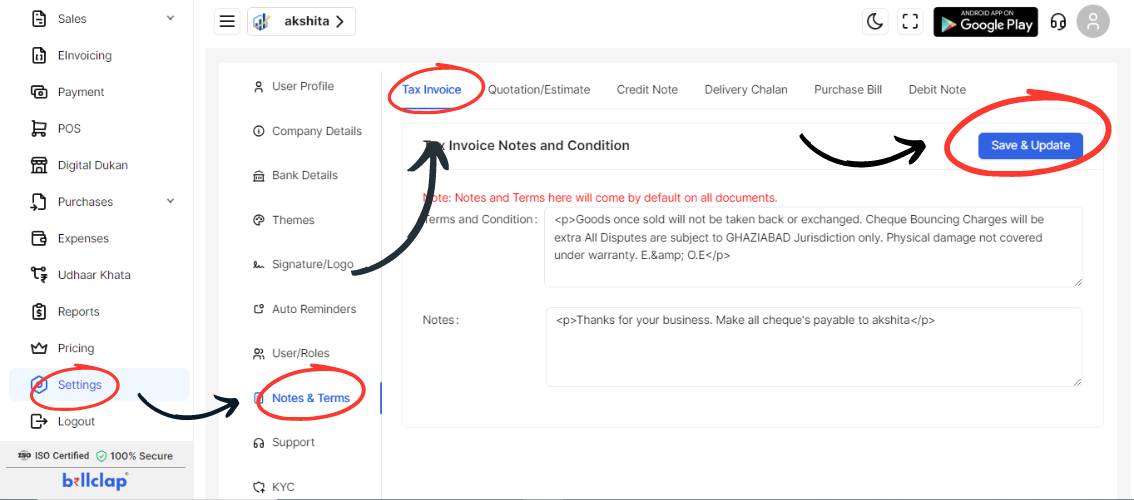
Step-by-Step Guide to Add Notes and Terms
Access Settings from the Dashboard:
Log in to your account on the dashboard.
Navigate to the main menu or dashboard area where you can find various settings options.
Click on Notes and Terms:
Look for a settings icon or gear symbol, often located in the top right corner or in the main menu.
Click on this icon to open the settings menu.
In the settings menu, select the “Notes and Terms” option.
Choose Where to Add Notes and Terms:
You will see various sections where you can add notes and terms. These include:
Tax Invoice
Quotation/Estimate
Credit Note
Delivery Chalan
Purchase Bill
Debit Note
Click on the section where you want to add notes and terms.
Fill in Notes and Terms:
Notes Column: Enter the relevant notes for the selected section.
Terms Column: Enter the applicable terms for the selected section.
Save Your Changes:
After filling in the notes and terms, look for the “Save” button.
Click on “Save” to apply your changes.
To finalize the update, click on “Update” if it appears.

Verify Notes and Terms:
Review the sections where you added notes and terms to ensure they are correctly saved.
Check the entries to confirm that they are displayed as expected.
Summary
Access Settings: Dashboard → Settings icon/gear.
Click on Notes and Terms: Select “Notes and Terms.”
Choose Section: Tax Invoice, Quotation/Estimate, Credit Note, Delivery Chalan, Purchase Bill, Debit Note.
Fill in Details:
Notes Column
Terms Column
Save Changes: Click “Save” and “Update” if required.
Verify Entries: Check that notes and terms are correctly saved.