Payments: Collect via Razorpay/Cashfree Payment Links & QR Codes
What is the Payments module?
Payments is BillClap's built-in tool for collecting money from your customers via Razorpay or Cashfree. You can send a payment link or show a QR code, and once the customer pays, a payment entry is automatically created against that party in BillClap — no manual typing needed. You then match that entry to the right invoice in one tap to clear the dues.
Important: Where the Money Actually Goes
Payments collected via these links and QR codes go directly into your own Razorpay or Cashfree account — not into a BillClap account. BillClap is not a payment aggregator and does not hold, route, or have visibility into your complete gateway account, balances, or settlements. BillClap is only a technology partner integrated with Razorpay and Cashfree to help you generate links/QR codes and pull payment status back into your books. For payout timing, settlement cycles, or account-level details, refer to your Razorpay or Cashfree dashboard directly.
Where to Find It — and Platform Availability
Look for Payments in the left sidebar (marked NEW). It has up to five sections, but availability differs by platform:
- Payment Links and Payment Integrations — available on both BillClap Desktop and the web application.
- Payment Dashboard and Payment QR Codes — currently available only on the BillClap Desktop application. These are not yet available on the web application.
- Payment Entries — available wherever your regular payment entries and ledgers are, on both Desktop and web.
Don't have BillClap Desktop yet? Download it here to access Payment Dashboard, Payment QR Codes, and the Link Payment option while creating invoices.
Step 1: Connect Razorpay or Cashfree
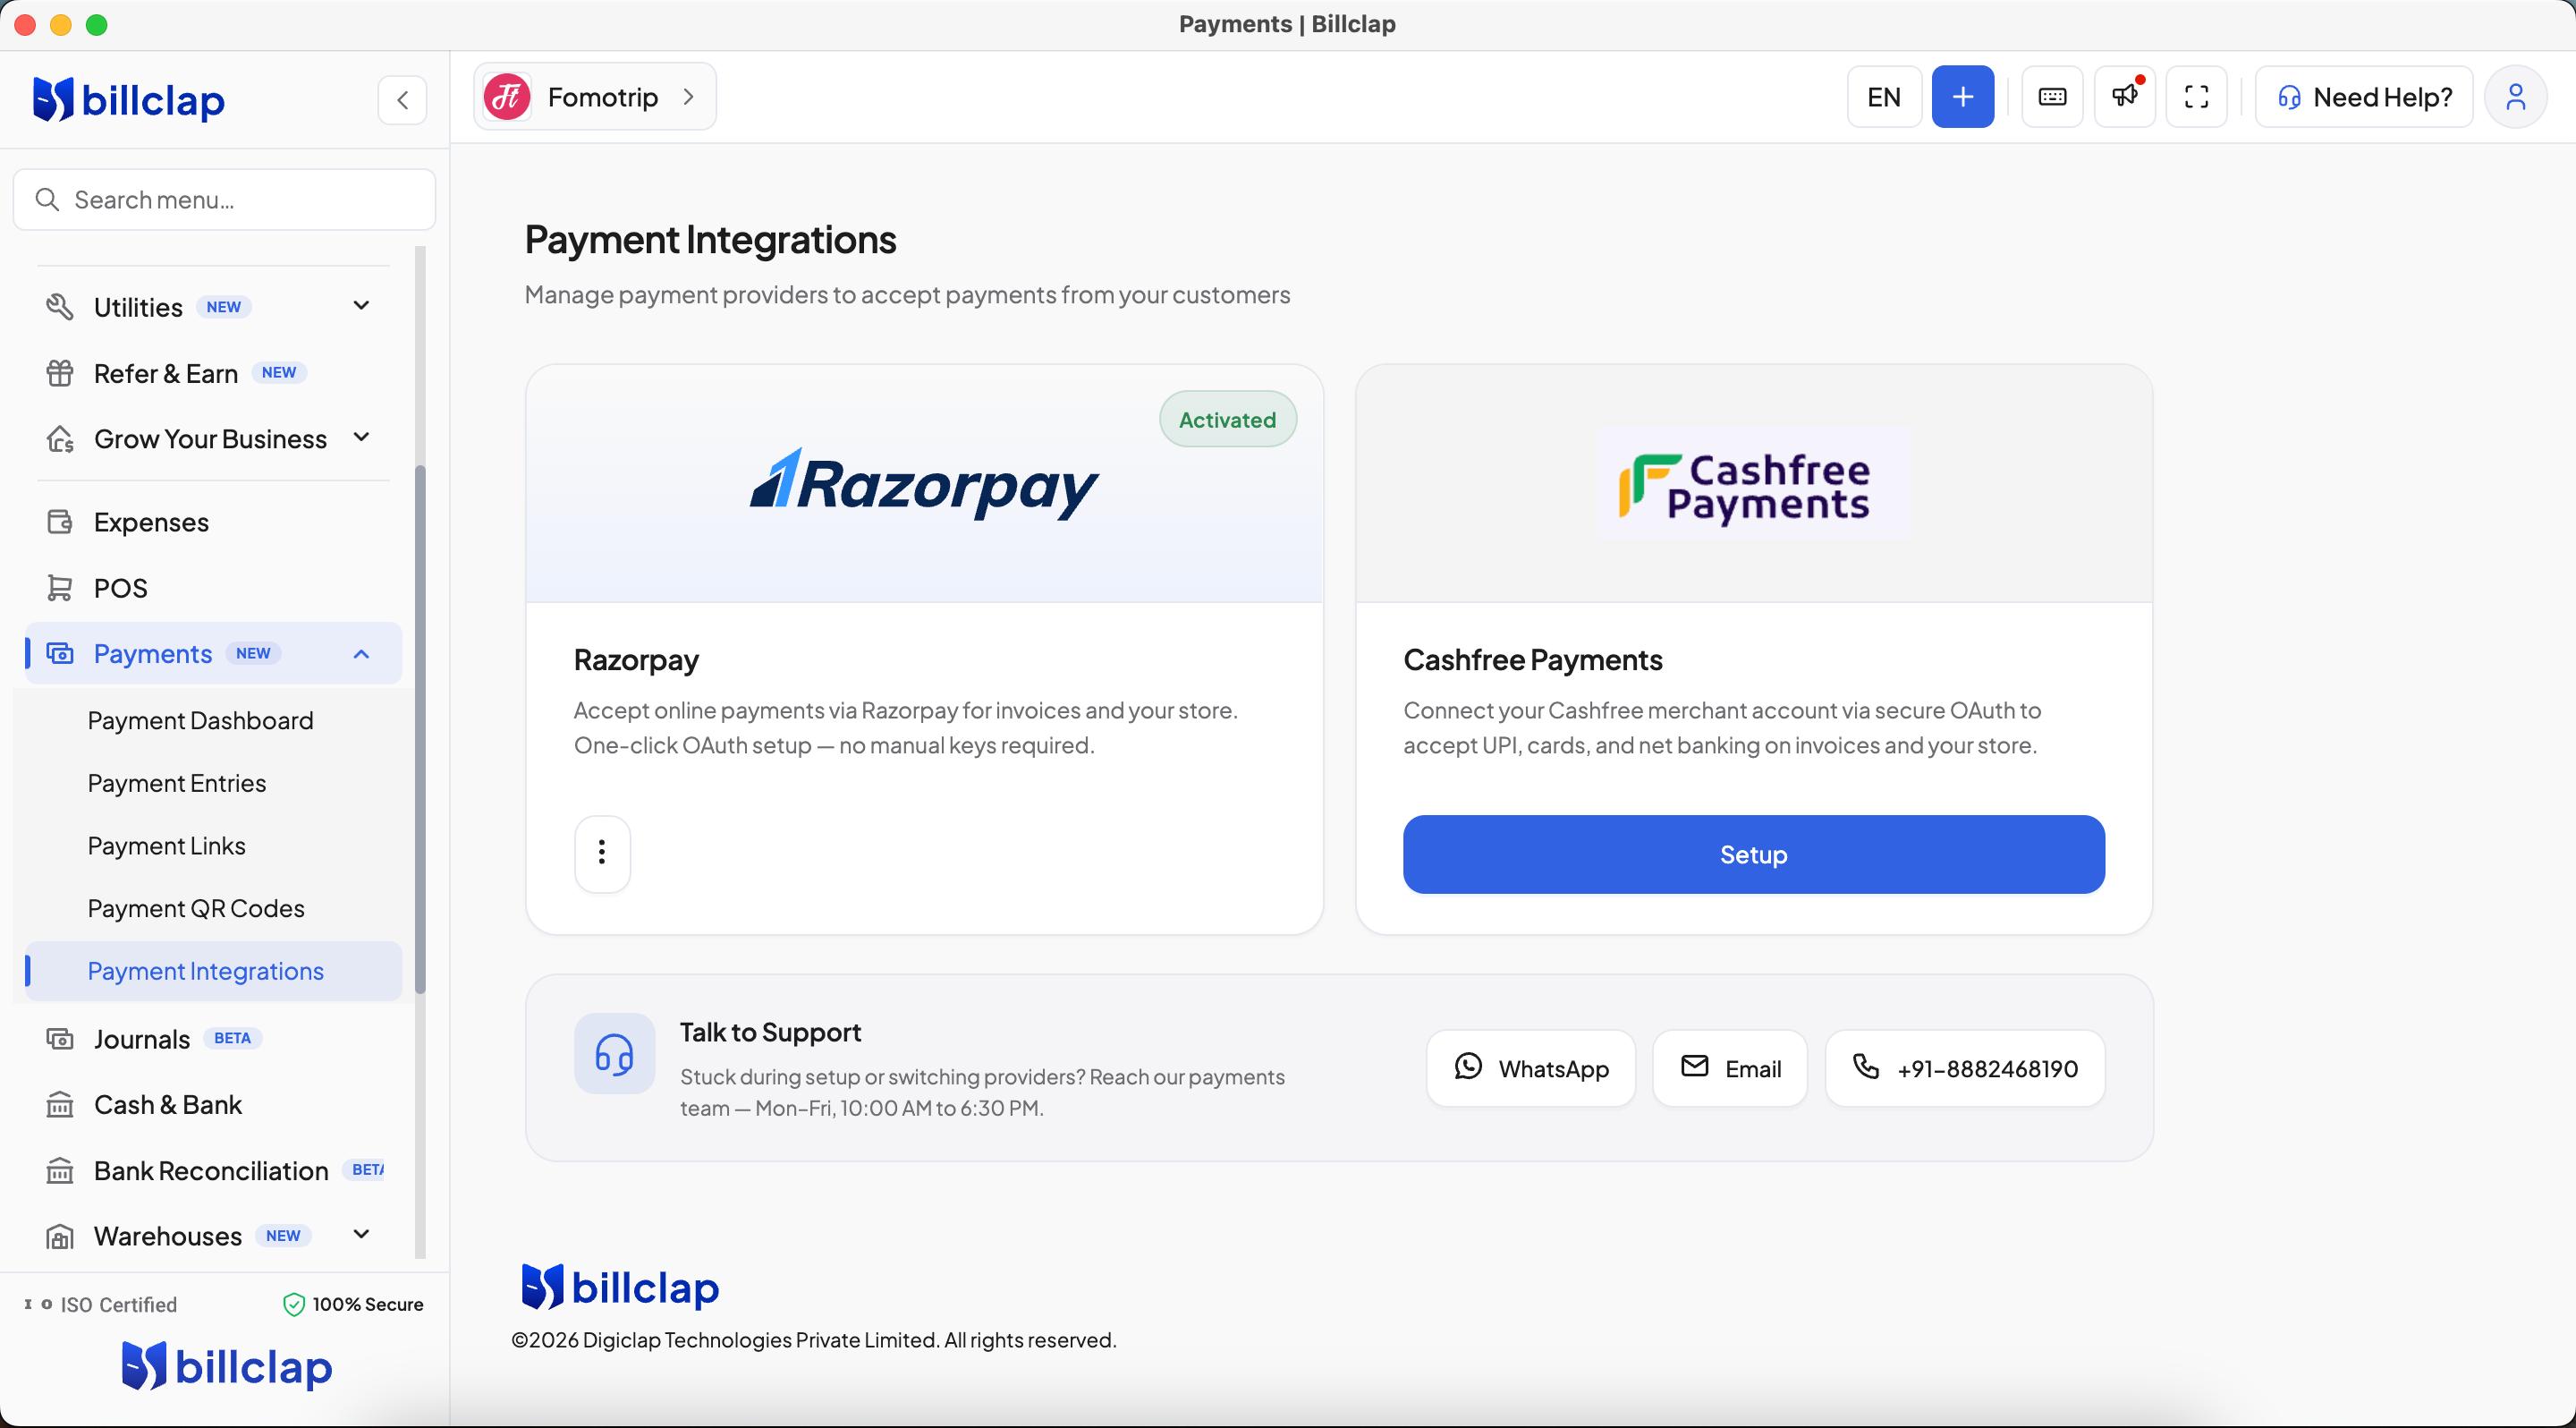
Go to Payments → Payment Integrations (Desktop or web). You'll see two cards — Razorpay and Cashfree.
- Razorpay: Click Setup and complete the one-click OAuth flow. No manual API keys required. If you don't have a Razorpay account yet, you can apply for one at razorpay.com.
- Cashfree: Click Setup and connect your Cashfree merchant account via secure OAuth to accept UPI, cards, and net banking. If you don't have a Cashfree account yet, you can apply for one at cashfree.com.
You can connect both. Whichever shows as Activated and marked "Active" is the provider new payment links and QR codes will use — you can switch this at any time.
Step 2: Generate a Payment Link
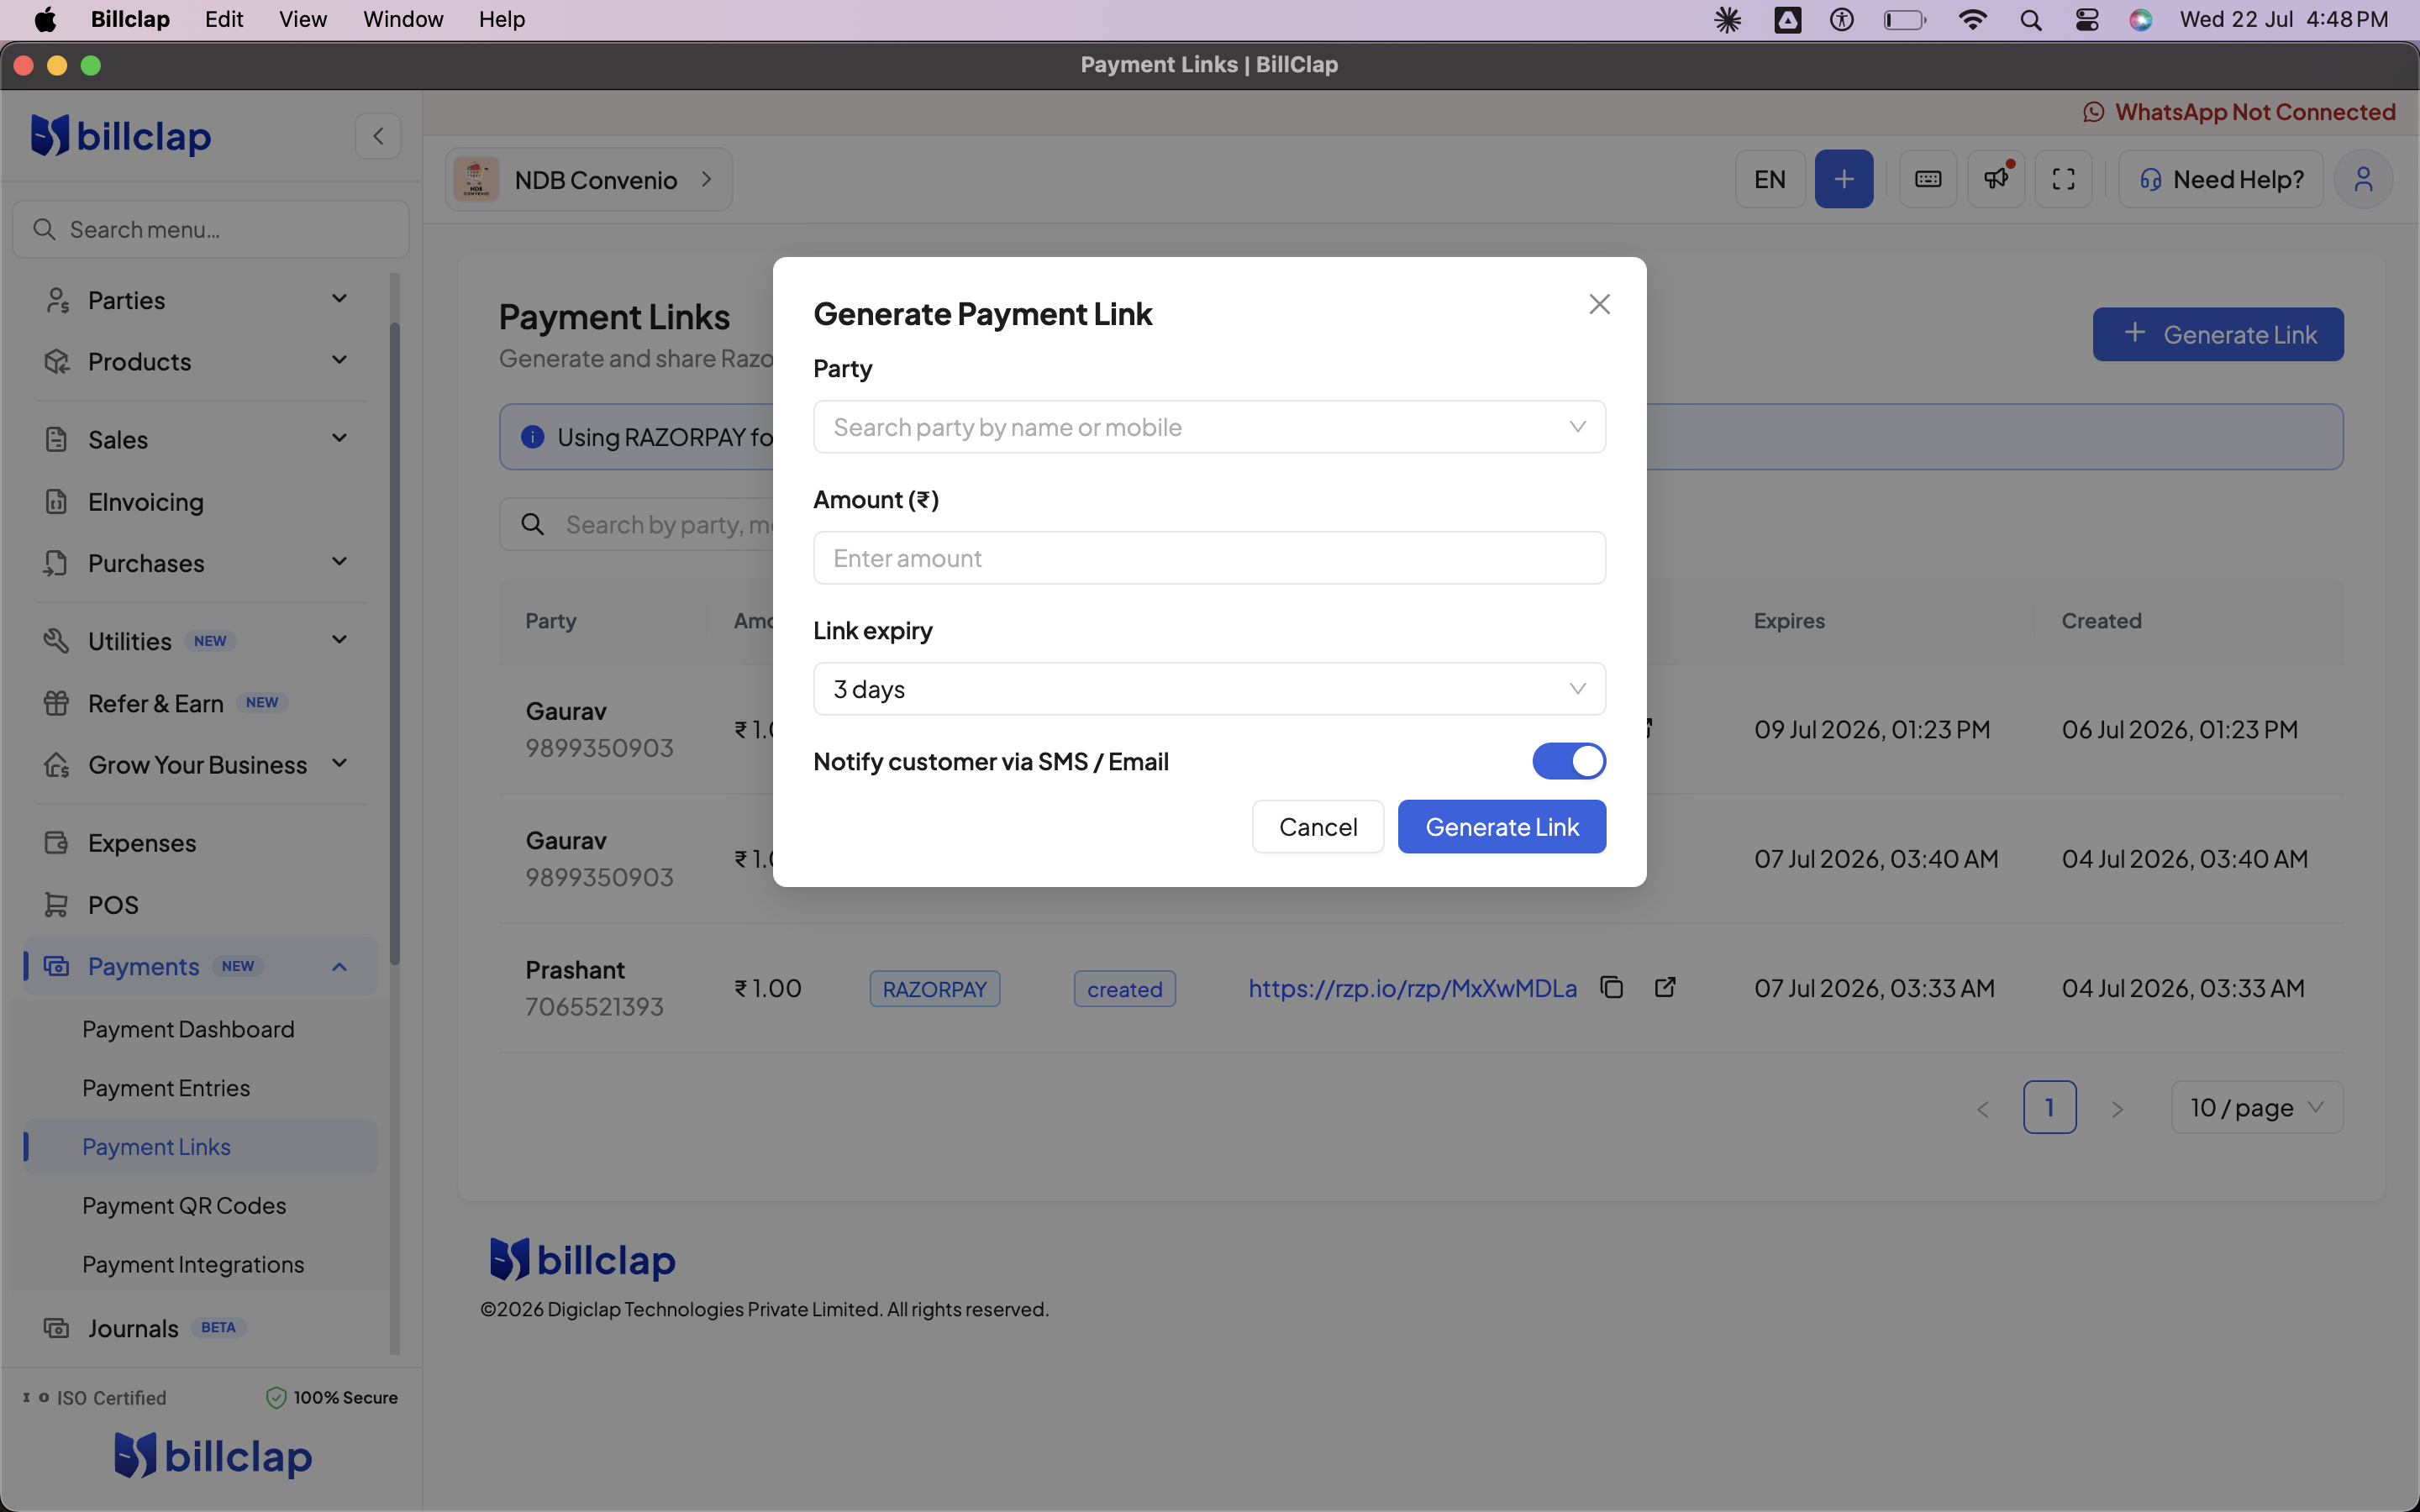
Go to Payments → Payment Links (Desktop or web) and click + Generate Link. In the dialog:
- Party: Search and select the customer by name or mobile number.
- Amount (₹): Enter the amount to collect.
- Link expiry: Choose how long the link stays valid (e.g., 3 days).
- Notify customer via SMS/Email: Keep this toggle on if you want BillClap to notify the customer automatically.
Click Generate Link. The link appears in your Payment Links list with its status (created / paid), and you can copy it or open it directly to share via WhatsApp or any other channel.
Step 3: Generate a Payment QR Code (Desktop only)
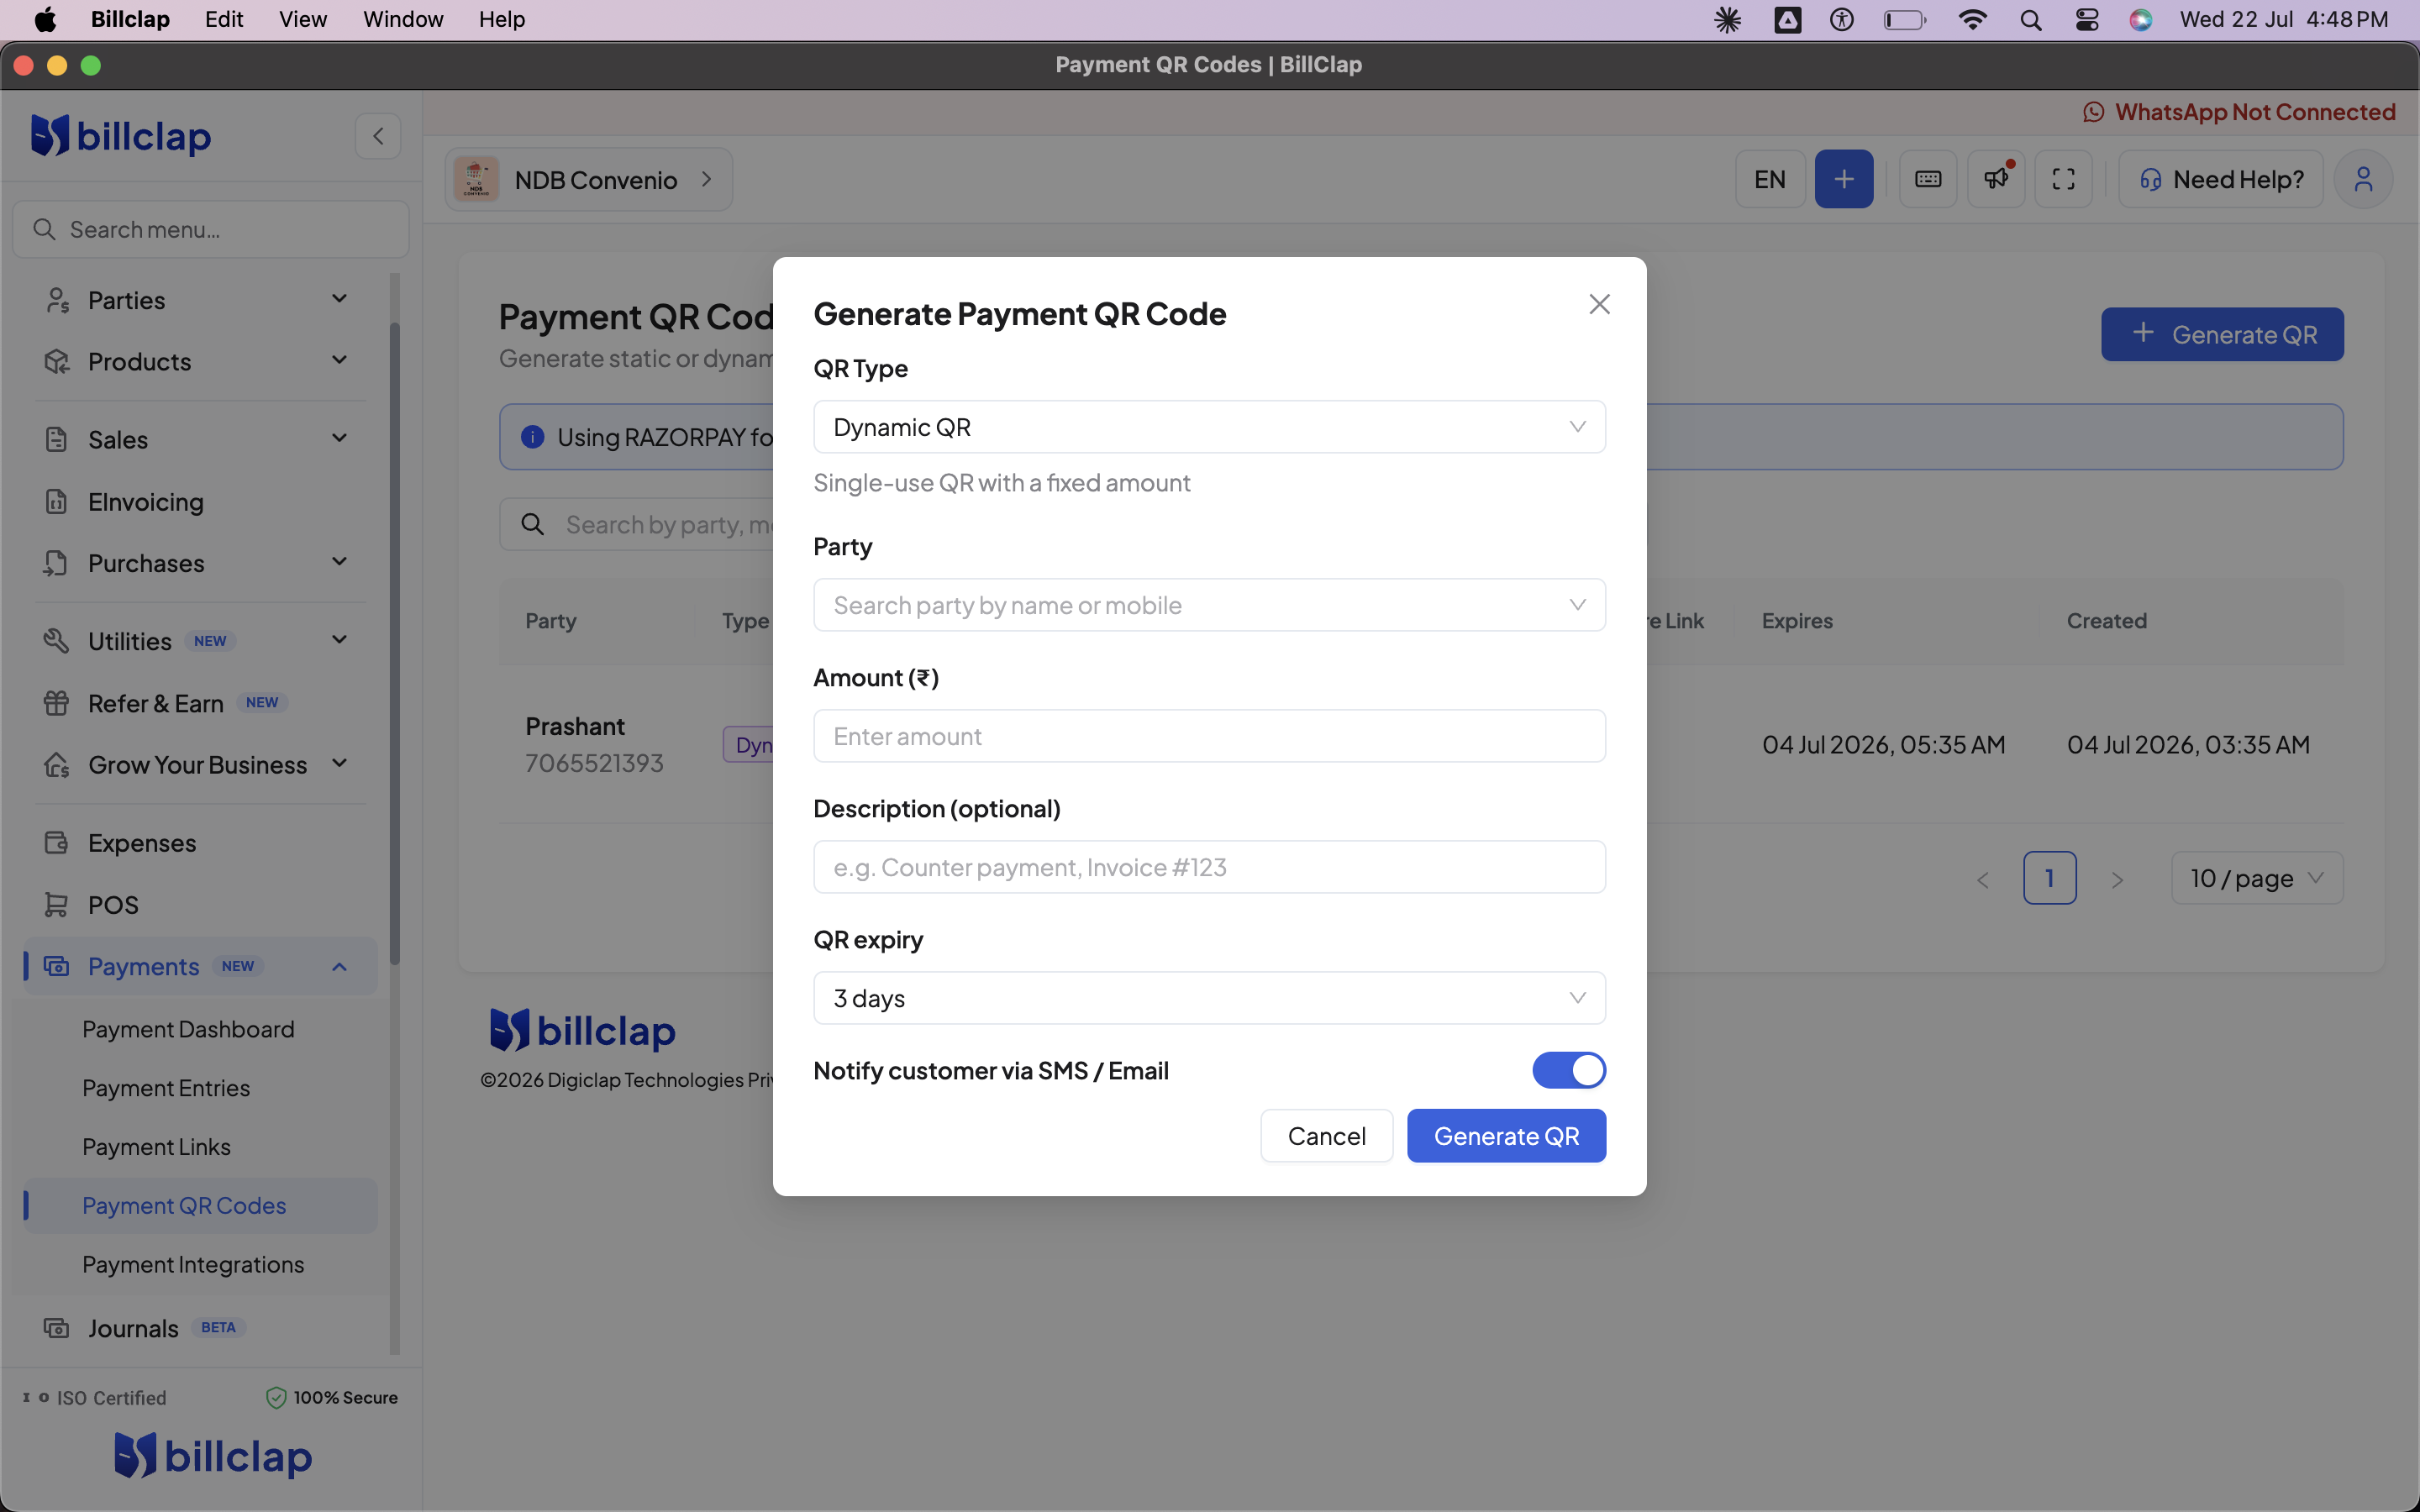
Go to Payments → Payment QR Codes on BillClap Desktop (download here if you don't have it yet) and click + Generate QR. In the dialog:
- QR Type: Choose Dynamic QR (single-use, fixed amount — good for a specific invoice) or Static QR (reusable, customer enters their own amount).
- Party: Search and select the customer.
- Amount (₹): Enter the amount (for Dynamic QR).
- Description (optional): Add a note like "Counter payment" or "Invoice #123".
- QR expiry: Set how long the QR stays active.
- Notify customer via SMS/Email: Toggle on if needed.
Click Generate QR. You can download the QR image and print it for your shop counter, or share the link directly. This feature is not yet available on the web application.
Step 4: What Happens When the Customer Pays
Once the customer completes payment via the link or QR code, the money is settled directly into your connected Razorpay or Cashfree account, and BillClap automatically creates a payment entry against that party in your books — you don't need to type the amount, date, or payment mode manually.
Important: The entry is created against the party automatically, but it is not automatically matched to a specific invoice, since BillClap has no way of knowing which bill the payment was intended for. Go to Payments → Payment Entries (or the party's ledger), find the new entry, and match it to the correct invoice in one tap to clear the dues.
Step 5: Received a Payment Before Raising the Invoice? Link It While Creating the Invoice (Desktop only)
Sometimes a customer pays before you've created the invoice for it — for example, an advance or a payment collected via link/QR ahead of billing. In this case, you don't need to go hunting for that payment separately. On BillClap Desktop (download here), while creating a Tax Invoice, you'll see a Link Payment toggle near the payment section (with a "Fully Paid" indicator next to it).
- Select the Party for the invoice first — this is required for Link Payment to find any unmatched payments against that party.
- Turn on Link Payment. BillClap will look for existing unmatched payment entries against that party and let you link them directly to this invoice as you create it.
- This saves you from creating a duplicate manual payment entry — the payment that already came in gets matched to the new invoice in the same flow.
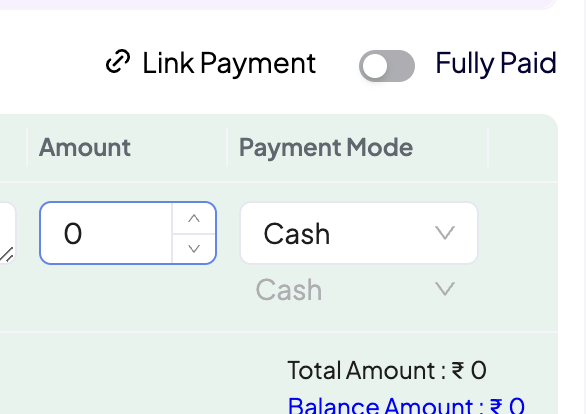
This is currently a Desktop-only capability, similar to Payment QR Codes and Payment Dashboard.
Step 6: Track Everything on the Payment Dashboard (Desktop only)
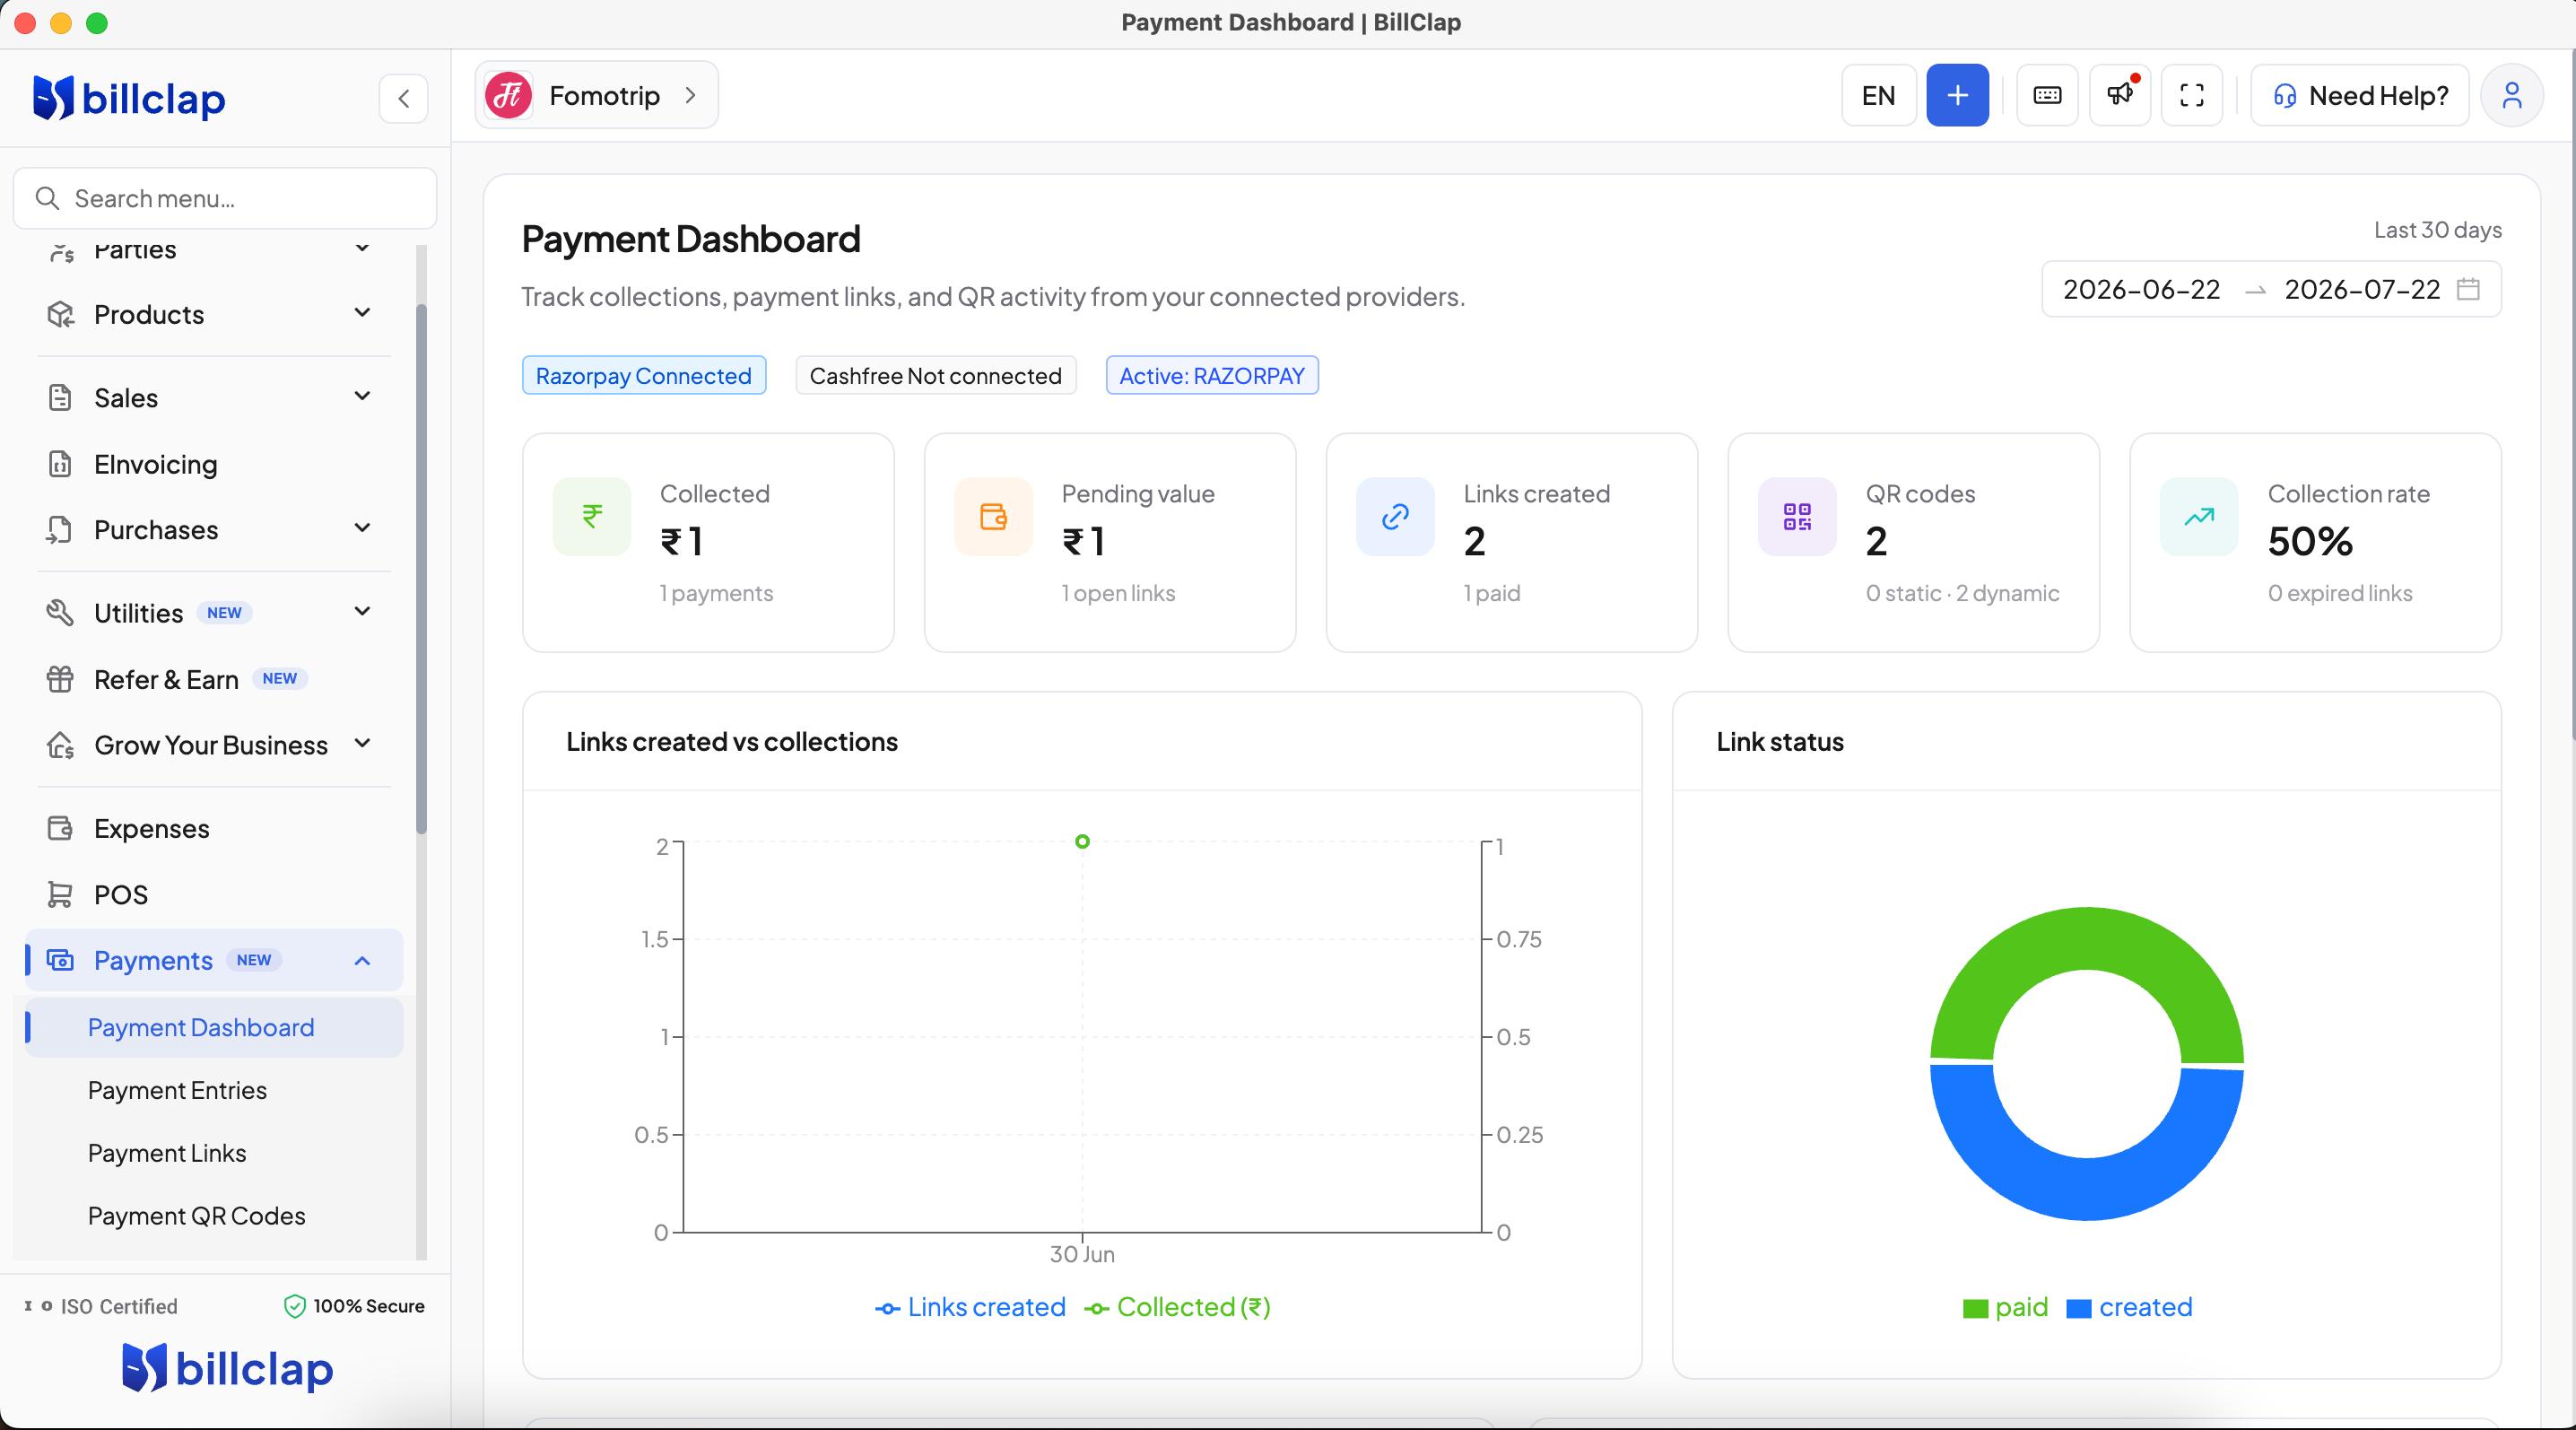
Go to Payments → Payment Dashboard on BillClap Desktop (download here) to see, for your selected date range:
- Collected and Pending value
- Links created and how many are paid
- QR codes generated (static vs dynamic)
- Collection rate
- A Links created vs collections trend graph
- Provider performance (Razorpay vs Cashfree)
- Top parties by links, paid count, and amount collected
- Recent collections and links/QR codes expiring in 48 hours
Step 7: Review All Payment Entries
Go to Payments → Payment Entries (Desktop or web) to see Total Received and Total Paid across your business, along with every individual entry — amount, payment mode (cash, UPI, bank, or gateway), settled invoice, party name, date, and notes. This is the same place your cash and bank payment entries live, so gateway payments don't sit in a separate silo.
Frequently Asked Questions
Does the money come into my BillClap account or my own bank/gateway account?
Directly into your own Razorpay or Cashfree account. BillClap is not a payment aggregator — it does not hold your funds or have visibility into your complete gateway account. BillClap only integrates with Razorpay/Cashfree as a technology partner to generate links/QR codes and reflect payment status in your books.
I don't have a Razorpay or Cashfree account — where do I apply?
You can apply directly at razorpay.com or cashfree.com, then come back to Payment Integrations in BillClap to connect the account via OAuth.
Is the Payments module available on both Desktop and web?
Payment Links, Payment Integrations, and Payment Entries are available on both. Payment Dashboard, Payment QR Codes, and the Link Payment option while creating an invoice are currently Desktop-only. If you're on web only, download BillClap Desktop to unlock these.
Does the payment entry automatically match to an invoice?
No. The entry is created against the party automatically, but you confirm the invoice match yourself in one tap, since BillClap doesn't know which bill the payment was for.
What if I received the payment before creating the invoice?
On BillClap Desktop, select the party while creating the Tax Invoice, then turn on the Link Payment toggle to match any existing unmatched payment against that party to this invoice.
Can I use both Razorpay and Cashfree at the same time?
Yes. Connect both under Payment Integrations, and switch which one is "active" for new links and QR codes whenever you like.
What's the difference between Static and Dynamic QR?
Dynamic QR is single-use with a fixed amount. Static QR is reusable, and the customer enters the amount themselves.
Can I set an expiry on payment links and QR codes?
Yes, both support configurable expiry (e.g., 3 days), and the dashboard warns you when items are expiring within 48 hours.
Is customer notification automatic?
Only if you keep the "Notify customer via SMS/Email" toggle on when generating the link or QR.
Related Articles: Payment Links, QR Codes & Auto Payment Entries (blog)