
How to Set Up and Use Loyalty Points in BillClap
Reward your regular customers on every bill. With Loyalty Points in BillClap, customers earn points when they buy, and use those points as a discount on a later bill. You set the rules once in Settings, then BillClap works out the points on every invoice by itself.
Watch the video
Prefer to watch? See the full Loyalty Points tutorial (2:47) on YouTube: https://youtu.be/us6xbPOJMl8
How it works in one example
- Sunita buys for ₹3,100. With ₹100 = 1 point, she earns 31 points.
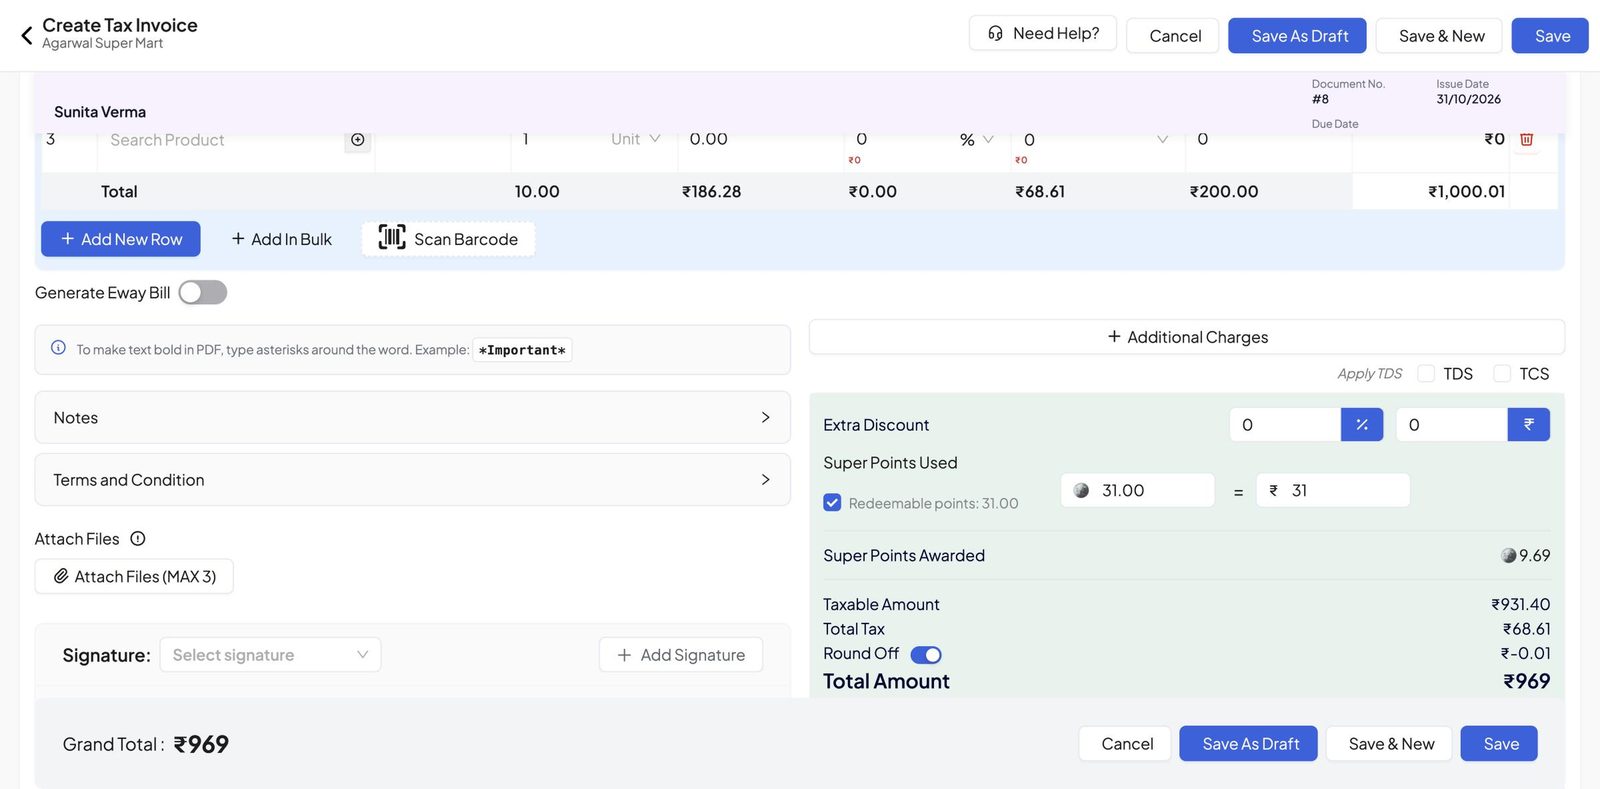
- On her next bill of ₹1,000, she uses those 31 points. With 1 point = ₹1, she gets ₹31 off and pays ₹969.
- She also earns new points on the ₹969 she paid.
The setup has two parts: Reward Setup (how points are earned) and Redeem Setup (how points are spent).
Part 1: Turn on Loyalty Points
Step 1: Open Loyalty Points in Settings
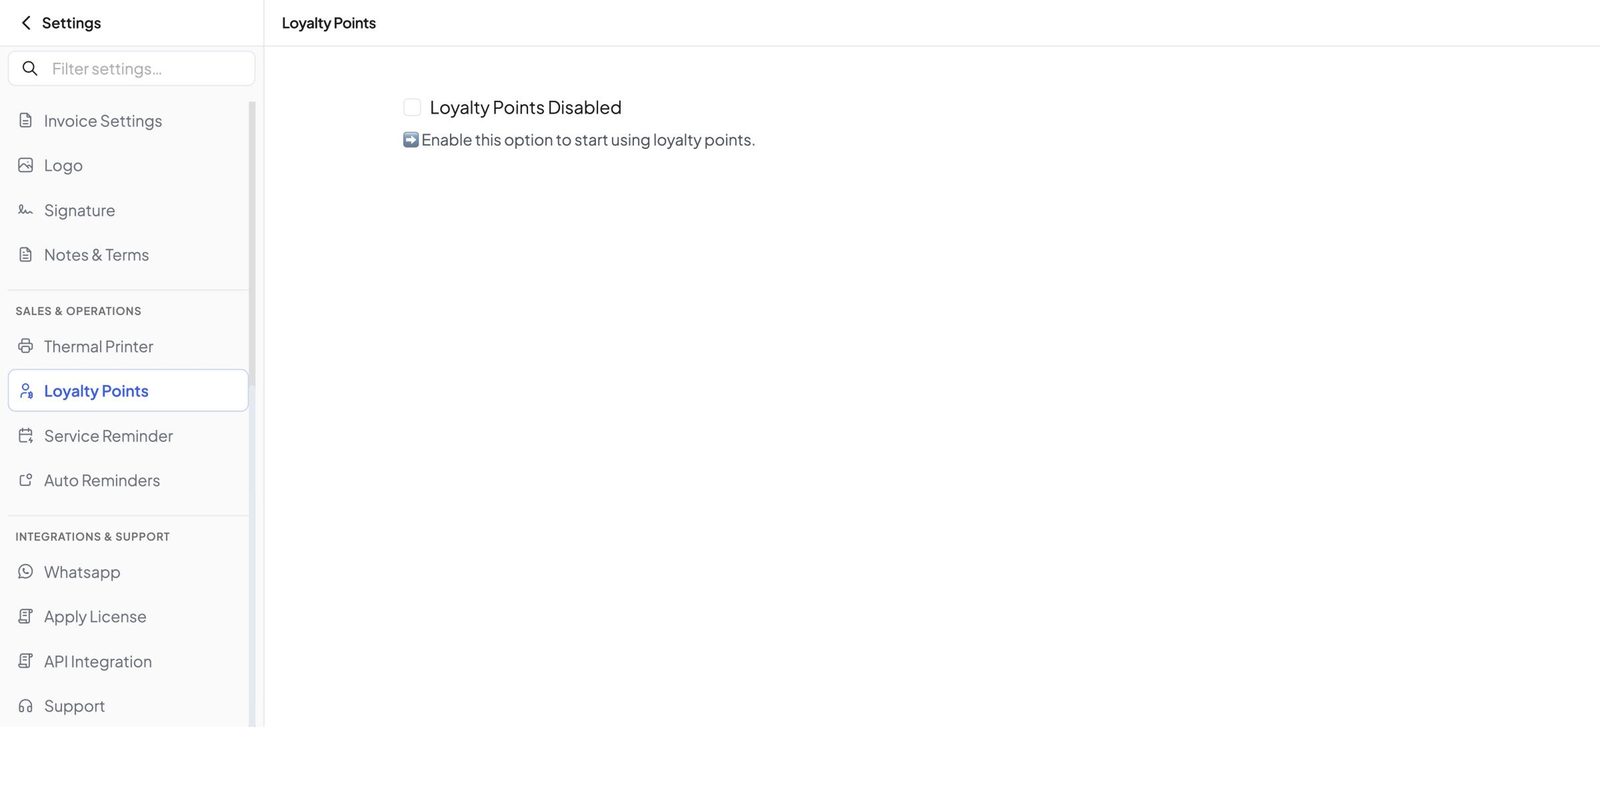
Go to Settings and click Loyalty Points (under Sales & Operations). Tick Loyalty Points Disabled to turn it on. A two-step setup opens: Reward Setup, then Redeem Setup.
Part 2: Reward Setup (how customers earn points)
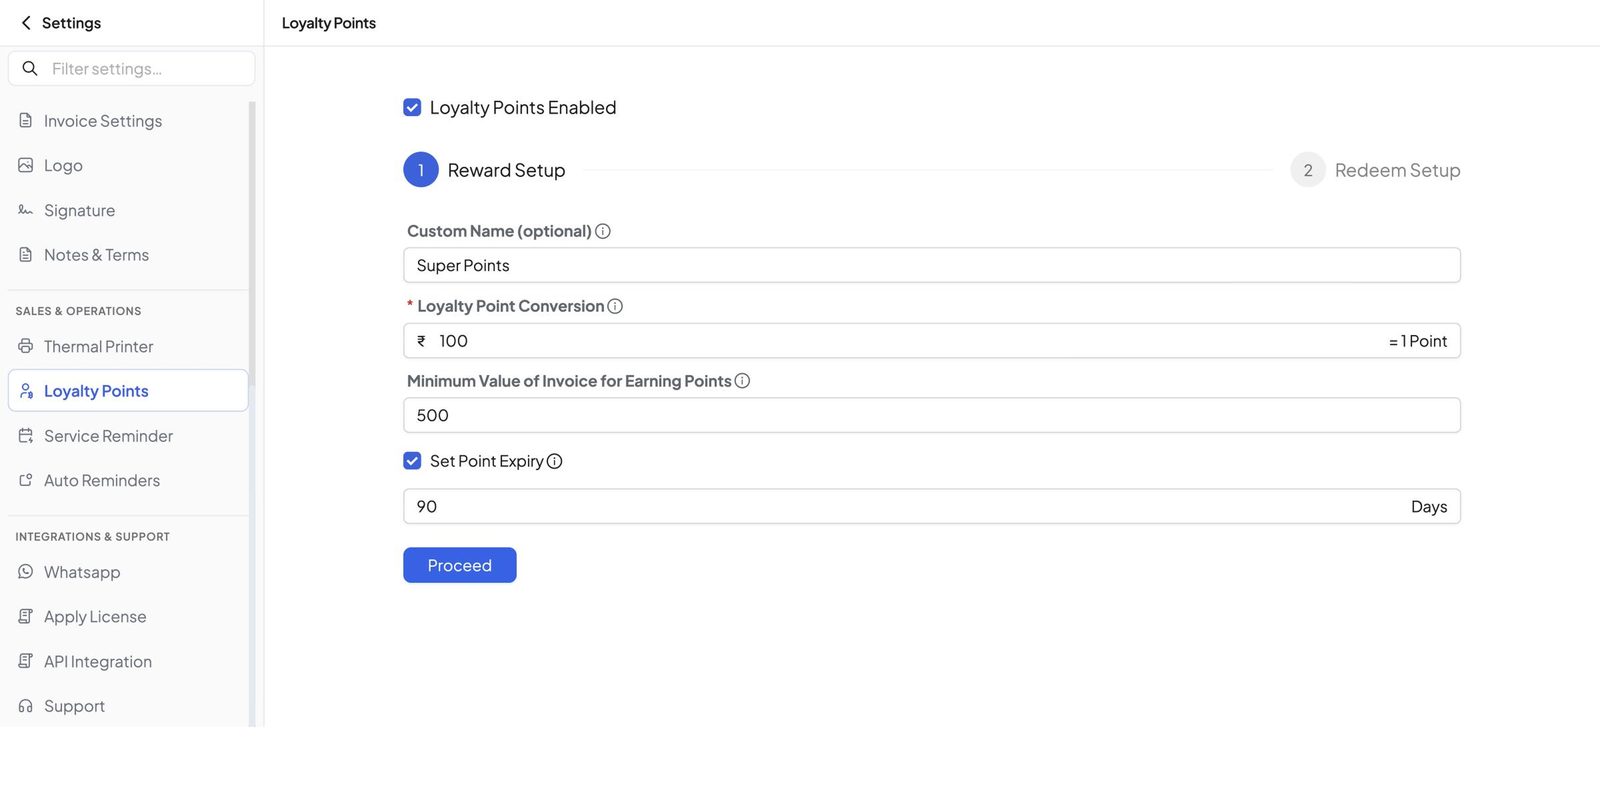
| Setting | What it means | Example |
|---|---|---|
| Custom Name (optional) | Your own name for the points. It replaces "Loyalty Points" on the invoice screen and in the menu. | Super Points |
| Loyalty Point Conversion | How much a customer must spend to earn 1 point. | ₹100 = 1 point, so a ₹3,100 bill earns 31 points |
| Minimum Value of Invoice for Earning Points | Bills below this amount earn no points. | ₹500: a ₹313 bill earns 0 points |
| Set Point Expiry | Points not used within this many days expire. Each earning gets its own expiry date. | 90 days |
Click Proceed to go to Redeem Setup.
Part 3: Redeem Setup (how customers spend points)
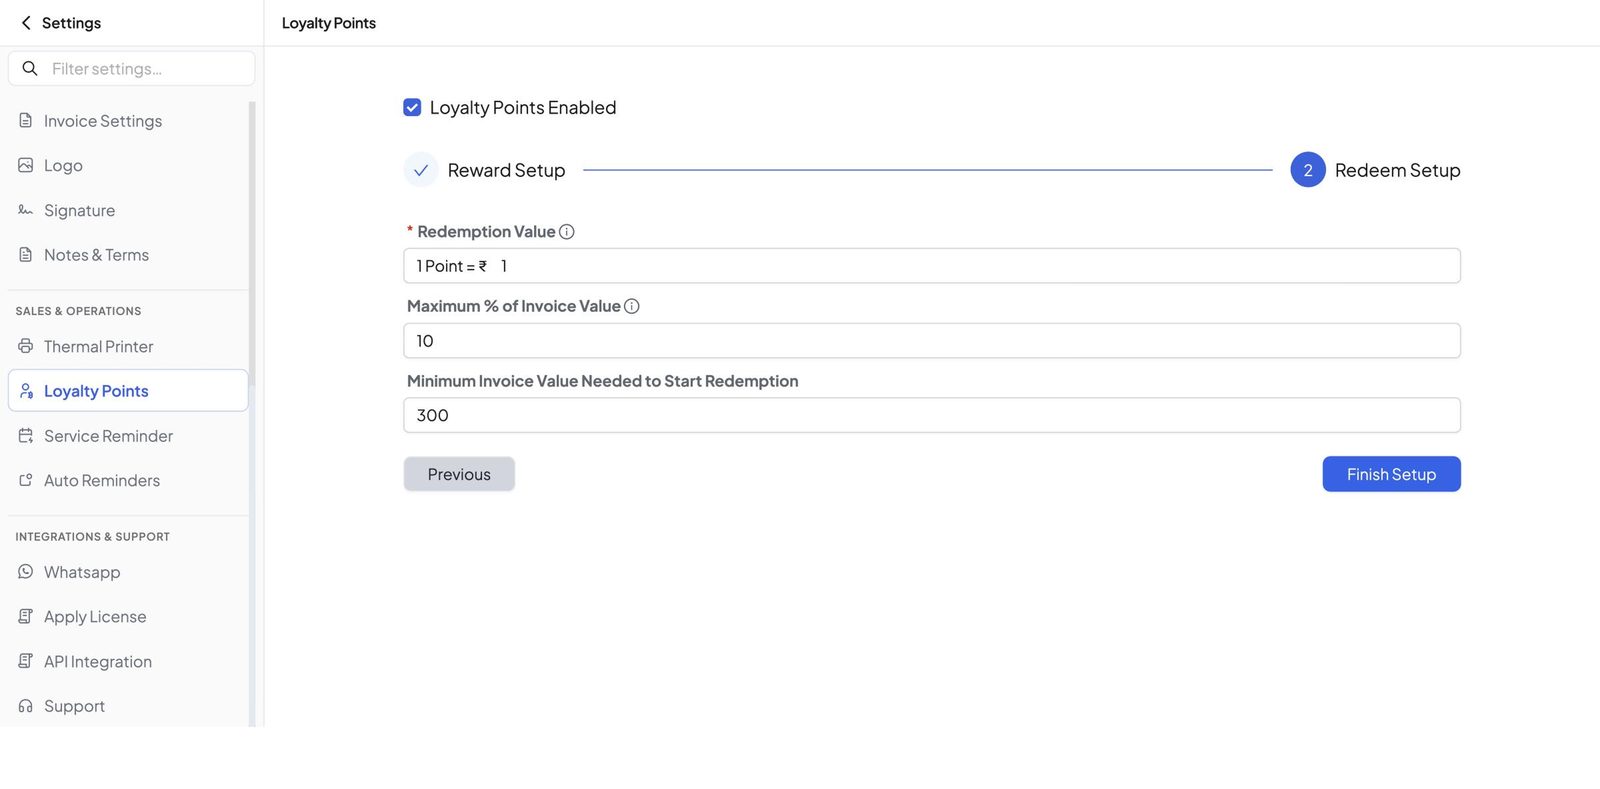
| Setting | What it means | Example |
|---|---|---|
| Redemption Value | How much discount 1 point gives. | 1 point = ₹1, so 31 points = ₹31 off |
| Maximum % of Invoice Value | The most that points can take off one bill, as a percentage of that bill. | 10%: on a ₹1,000 bill, at most ₹100 can be paid with points |
| Minimum Invoice Value Needed to Start Redemption | Bills below this amount cannot use points. | ₹300 |
Click Finish Setup. You'll see "Loyalty Points settings created successfully."
Tip: Conversion and Redemption Value together decide how generous your scheme is. ₹100 = 1 point and 1 point = ₹1 means customers get about 1% back. ₹100 = 2 points would give 2% back.
Part 4: Customers earn points on a bill
Step 2: Make a tax invoice for the customer
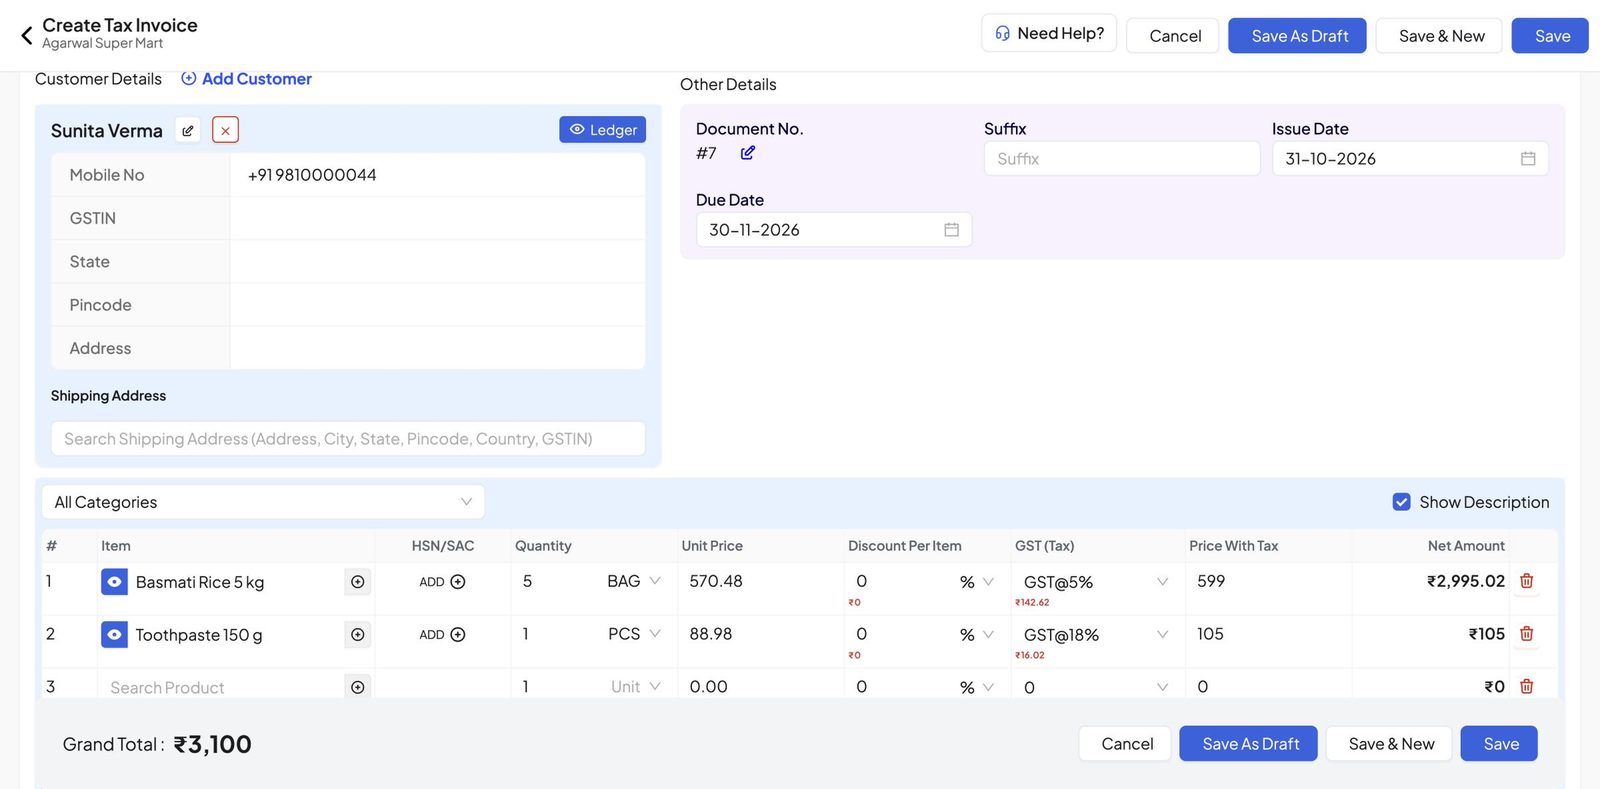
Create a tax invoice as usual and pick the customer. Points are linked to the customer, so choose the customer on the bill. Here, Sunita Verma buys 5 bags of Basmati Rice and a toothpaste for ₹3,100.
Step 3: Check the points awarded and save
Scroll down. Super Points Awarded (it shows your custom name) is 31, because ₹3,100 ÷ ₹100 = 31. Click Save, and the 31 points are added to Sunita's account.
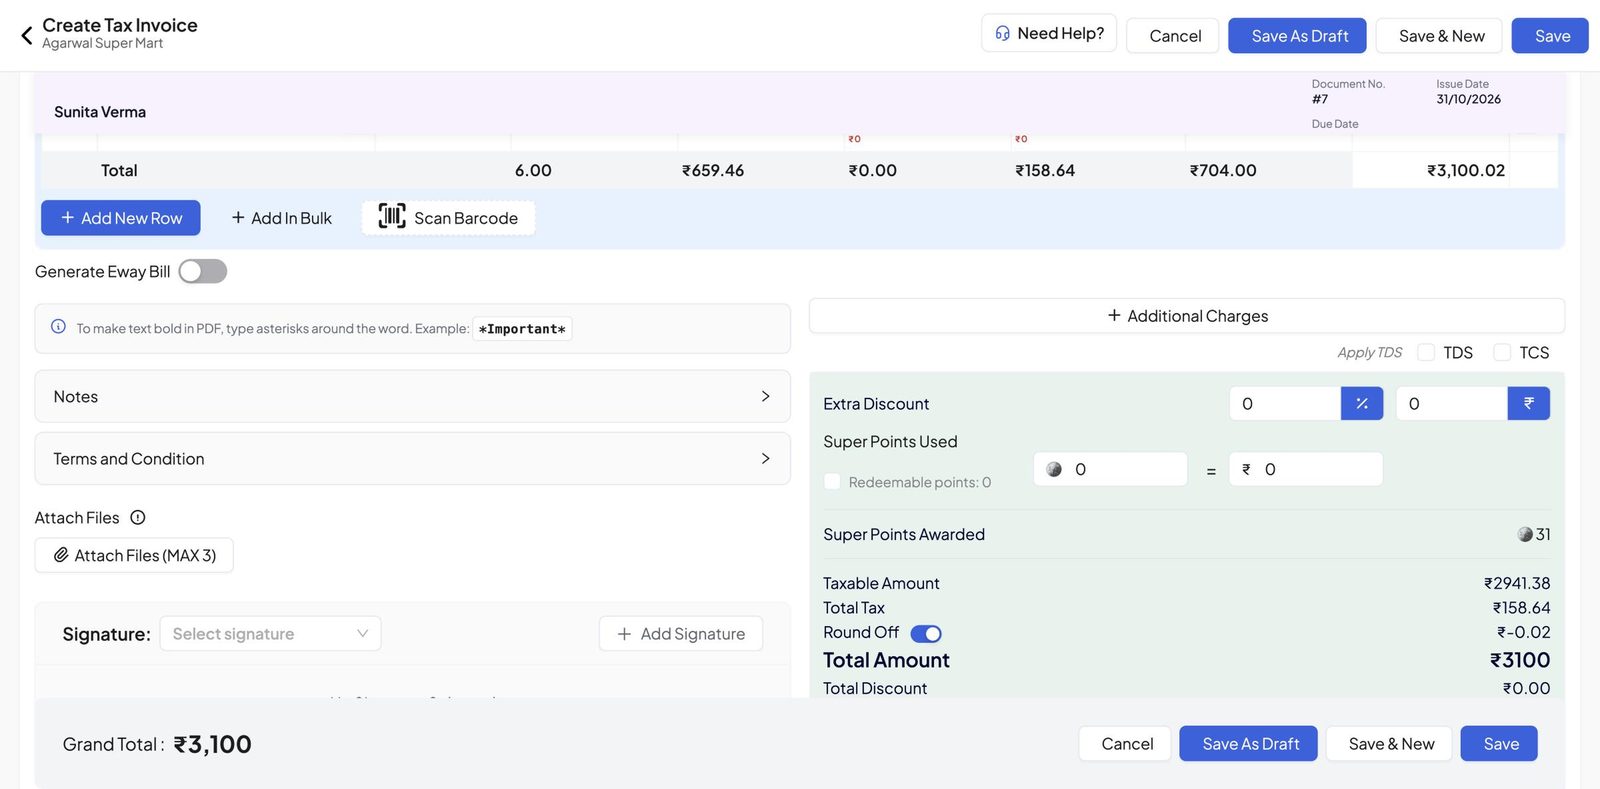
Good to know: points are worked out on the bill's total amount, including GST, and can have decimals (for example 9.69 points).
Part 5: Customers use points on the next bill
Step 4: Tick Redeemable points
On Sunita's next invoice, after adding the items, the Super Points Used box shows Redeemable points: 31.00. Tick it. The 31 points apply as a ₹31 discount, and the total drops from ₹1,000 to ₹969. She still earns 9.69 new points on the ₹969 she pays.
Why can't my customer use all their points?
This is the question we hear most. "Redeemable points" is the number the customer can use on this bill, which can be lower than their full balance because of your Redeem Setup rules:
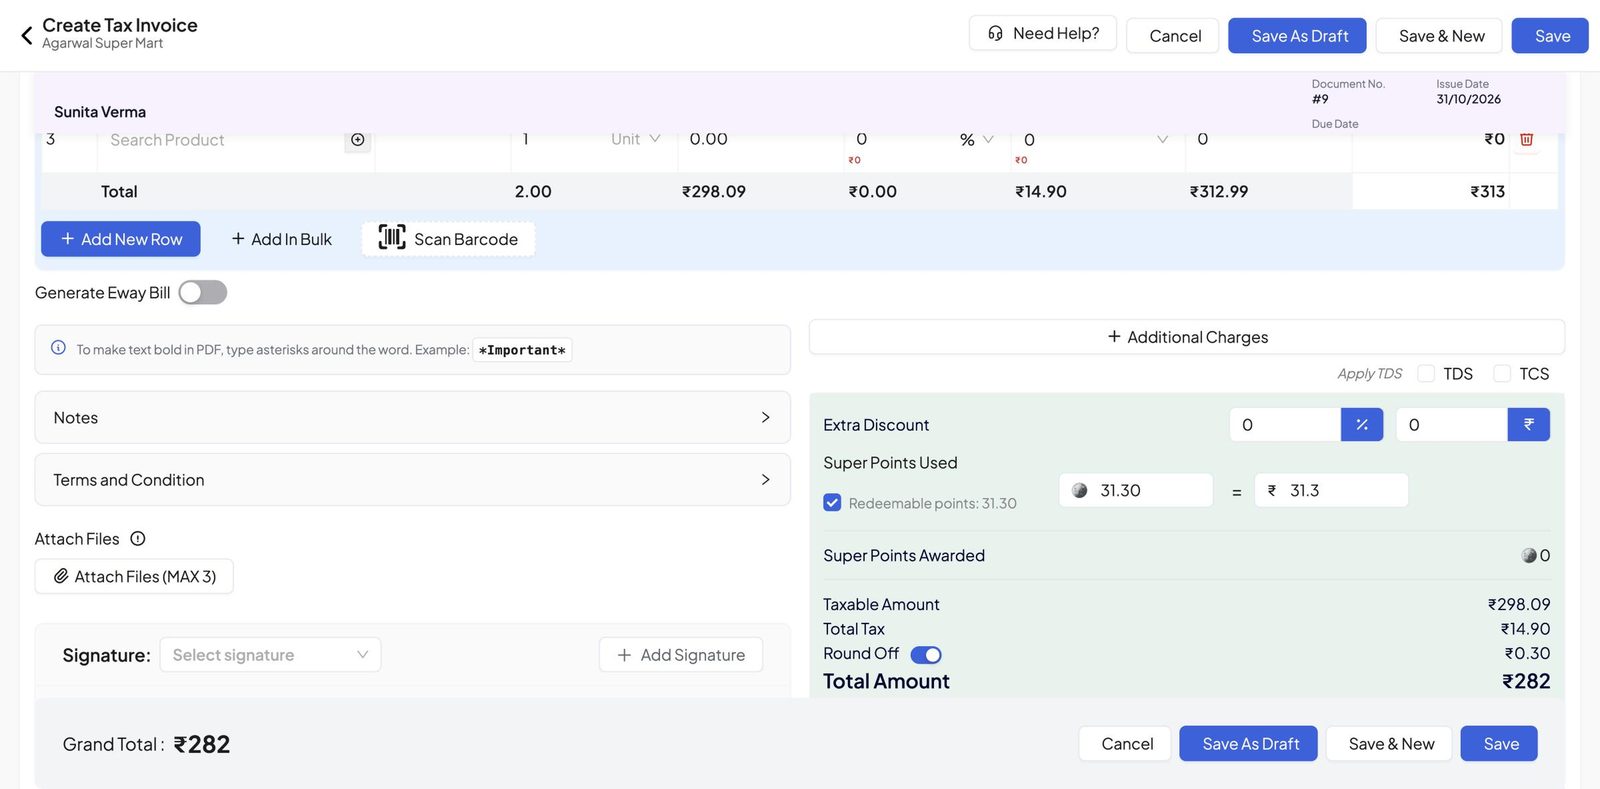
- Maximum % of Invoice Value: in the example below, Sunita has almost 60 points, but the bill is only ₹313. With a 10% limit, only 31.30 points (₹31.30) can be used. The rest stay in her account for later.
- Minimum Invoice Value Needed to Start Redemption: if the bill is below this amount (₹300 in our example), Redeemable points shows 0.
- Minimum Value of Invoice for Earning Points: the same ₹313 bill shows Super Points Awarded 0, because it is under the ₹500 minimum for earning.
Part 6: Track every point
Step 5: Open the points ledger
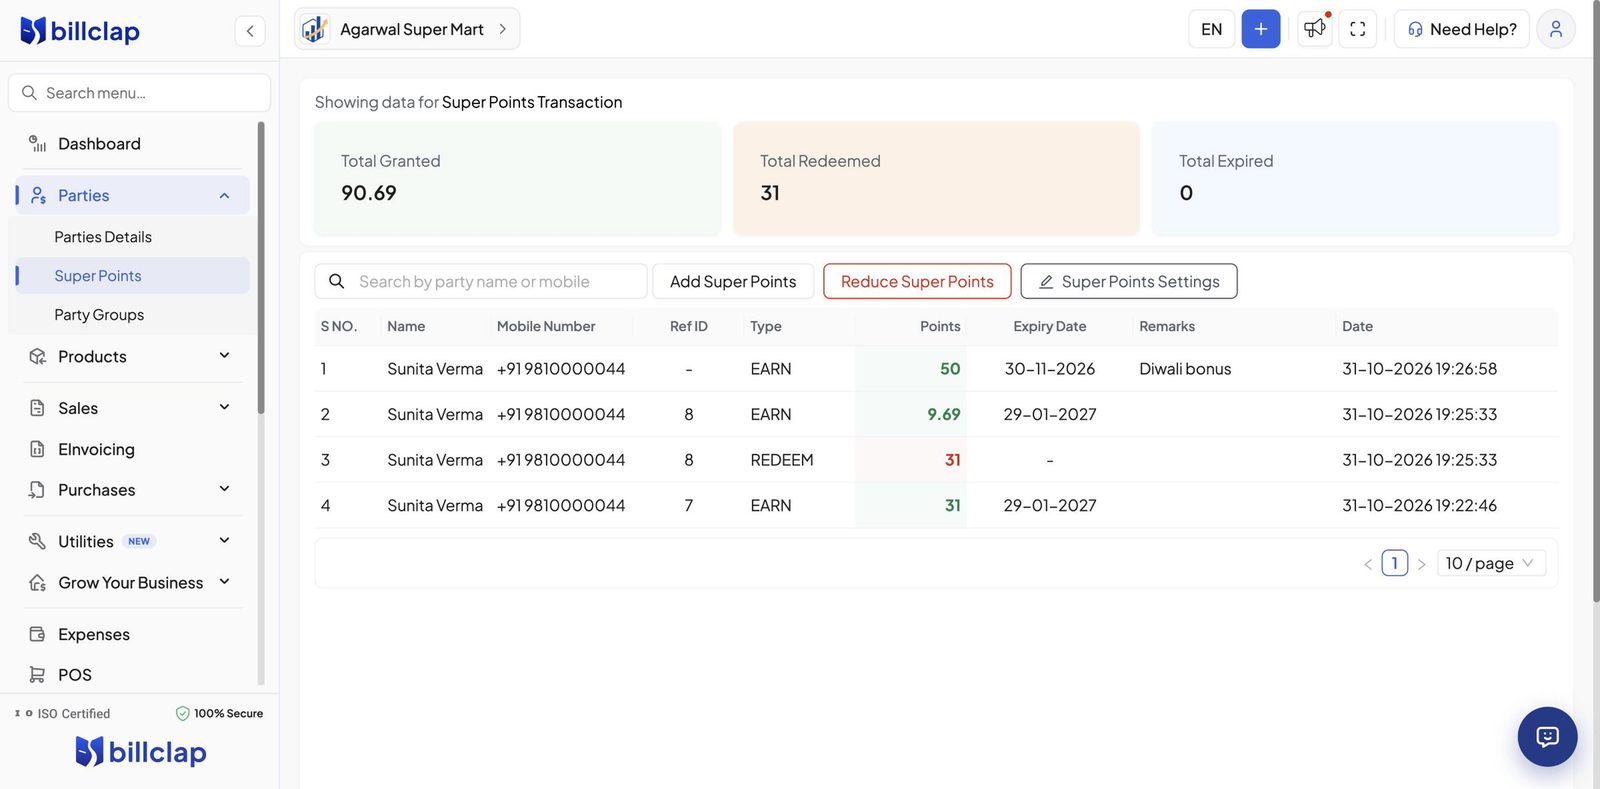
In the left menu, open Parties and click the points page (it uses your custom name, here Super Points). At the top you see Total Granted, Total Redeemed and Total Expired. Below, every entry is listed with the customer, the invoice number (Ref ID), the type (EARN or REDEEM), the points, the expiry date and any remarks. Use the search box to find a customer by name or mobile number.
Step 6: Give bonus points or take points back
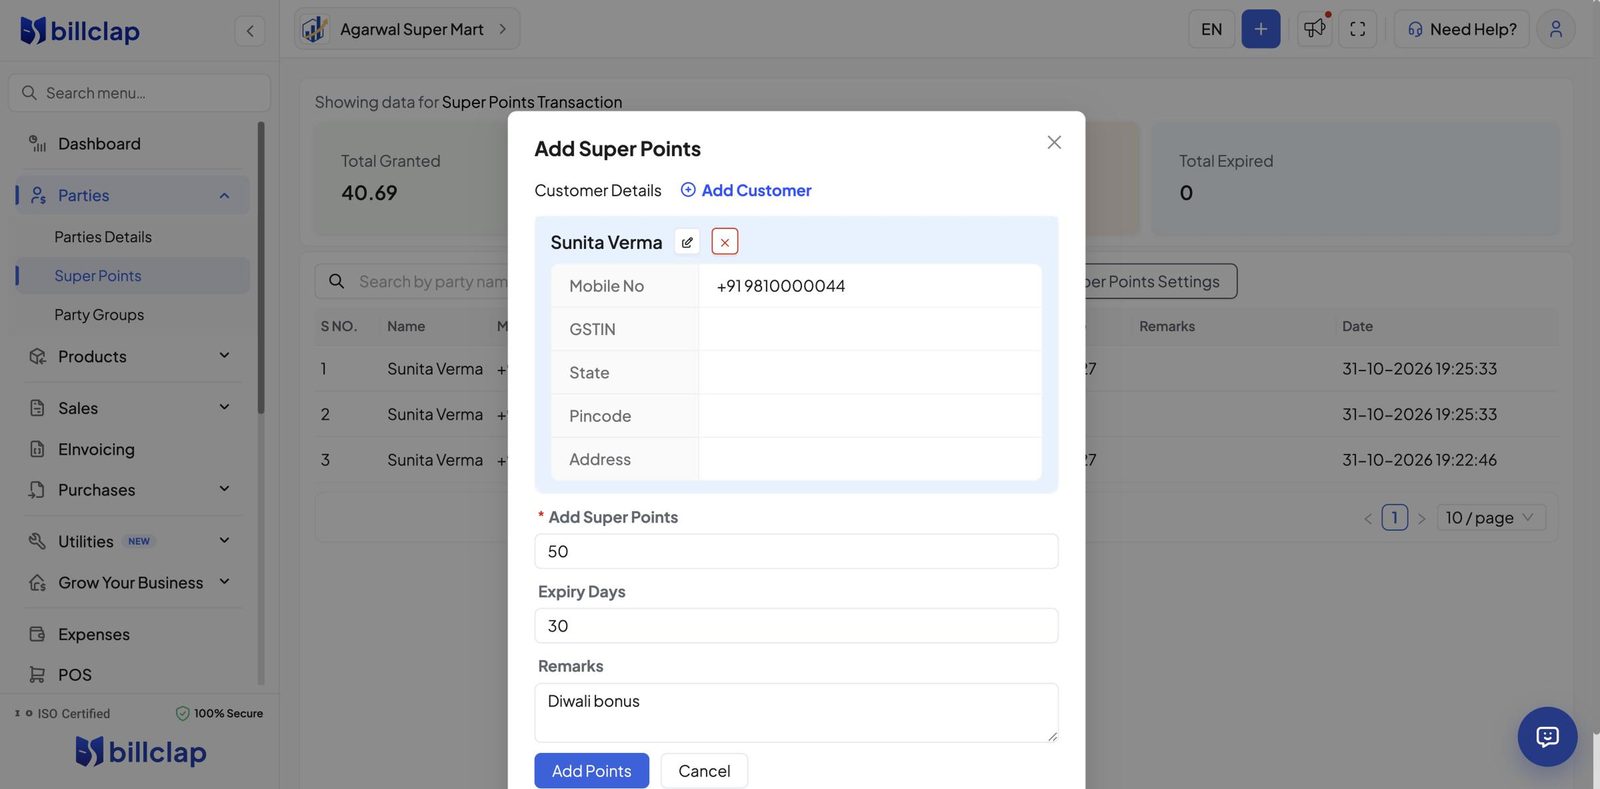
To reward a customer outside a bill, for example a festival or birthday bonus, click Add Super Points. Pick the customer, enter the points, the Expiry Days and an optional remark, then click Add Points. The bonus appears in the ledger straight away with its own expiry date. To take points back, use Reduce Super Points. You can reopen the settings any time with Super Points Settings.
Quick recap
- Reward Setup: conversion (₹100 = 1 point), minimum bill to earn, and expiry days.
- Redeem Setup: value of 1 point, maximum % of a bill, and minimum bill to redeem.
- Bill as usual with the customer selected. Points are added on save, and ticking Redeemable points on a later bill gives the discount.
- Track everything under Parties, and add or reduce points by hand when needed.