
How to Customize Your Invoice in BillClap: Design, Columns, Fields and Letterhead
Every business needs something different on its invoice. A pharmacy needs batch and expiry, a garment shop needs size, a transporter needs the vehicle number and a grocery store needs its FSSAI licence. In BillClap you can change much more than the design: you choose which columns print, what they are called and their order, add your own fields, leave space for a letterhead, and set the totals, numbering and wording.
Watch the video
Prefer to watch? See the full invoice customization tutorial (3:13) on YouTube: https://youtu.be/AAOr5Y8C3ao
Where each setting lives
- Settings › Print Setting: template, colour, header details, font sizes, letterhead space, totals and footer.
- Create Tax Invoice › Custom Headers: show or hide item columns, rename columns, add document, customer and vendor fields.
- Settings › Invoice Settings: change the order of item columns.
- Settings › Company Details › Additional Fields: licence numbers such as FSSAI or Drug Licence.
- Tax Invoices › Tax Invoice Settings: document name, number prefix and suffix, date label and display switches.
Part 1: Template and colour
Step 1: Open Print Setting
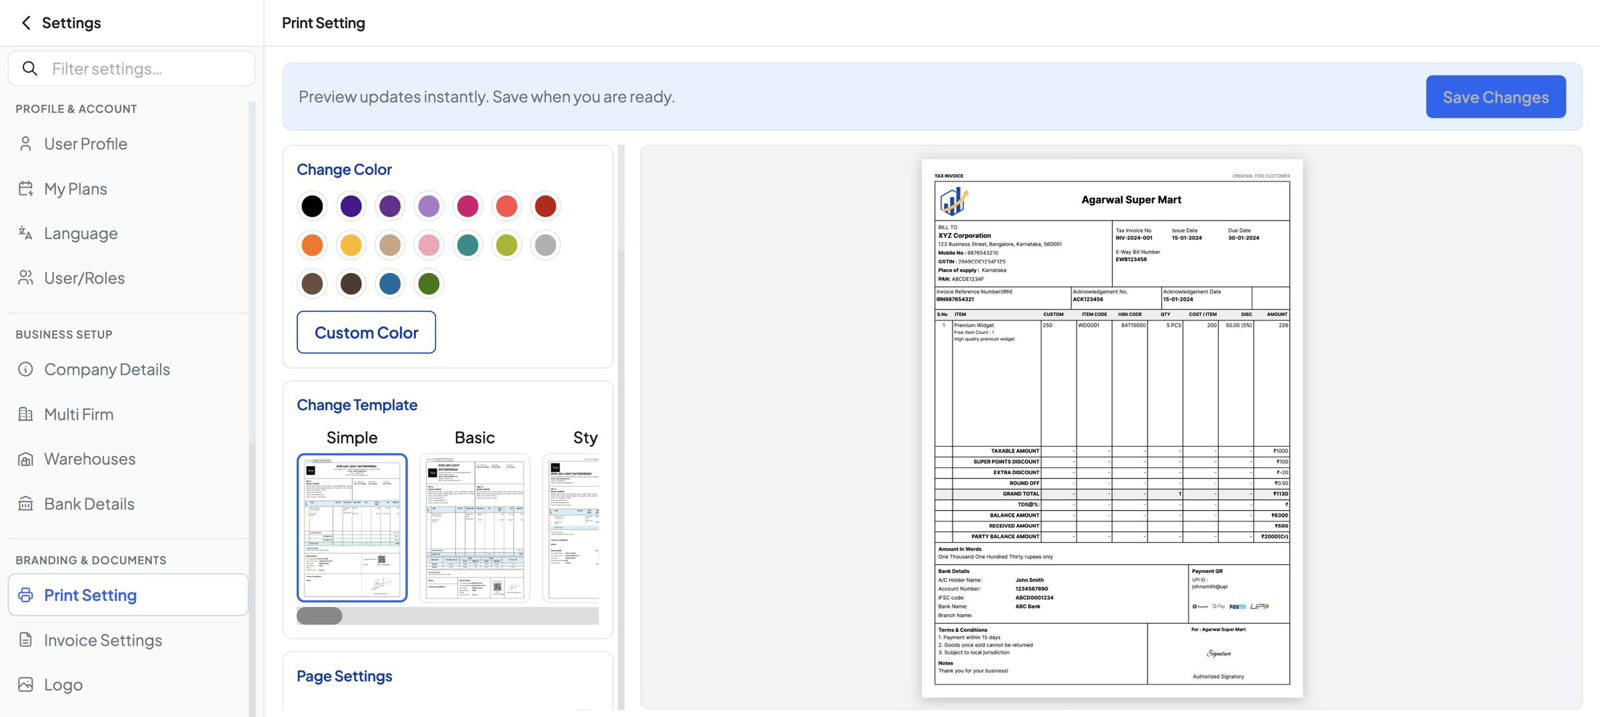
Go to Settings › Print Setting. The preview on the right updates as soon as you change anything, so you can see the result before you save.
Step 2: Pick a template
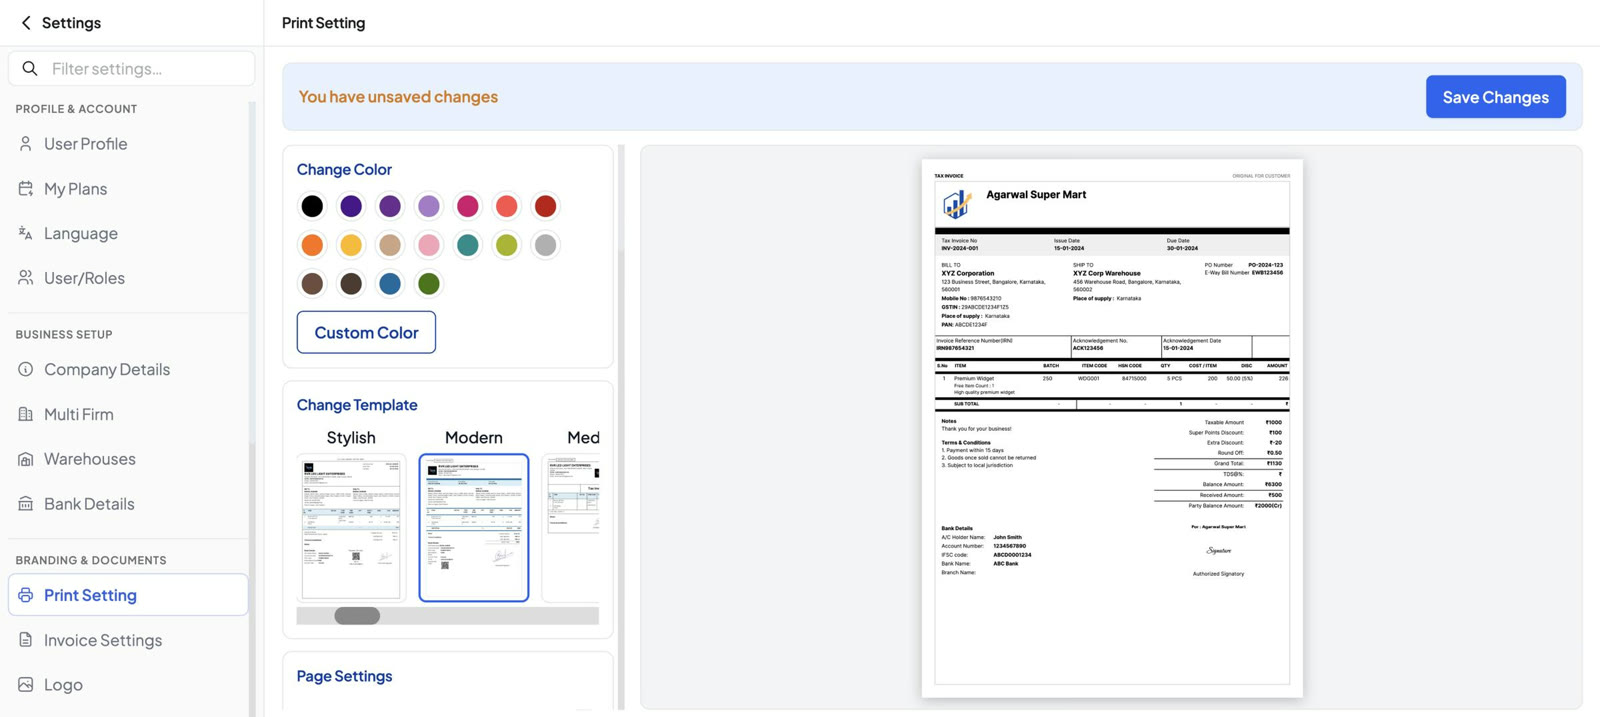
Scroll the Change Template strip and click a template. There are 16: Simple, Basic, Stylish, Modern, Medical, Non-GST, Jewellery, E-commerce, Electronic, Bold, Clarity, Dual color, Professional, Tally, A5 (Basic) and A5 (Advance).
Step 3: Choose a colour
Click a colour under Change Color, or use Custom Color to enter your exact brand colour.
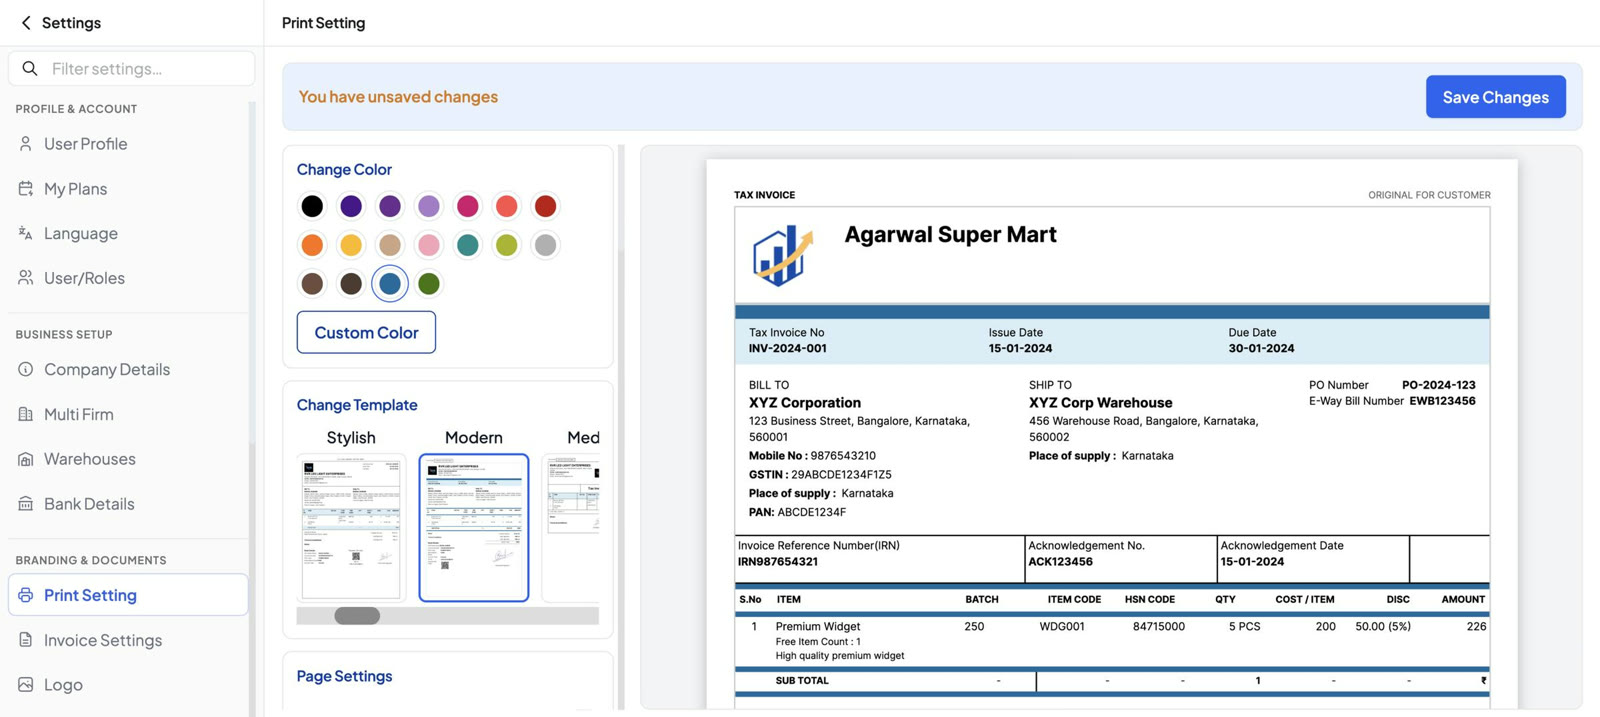
Tip: you can also change the template and colour from any invoice's view page, using the Change Template and Change Color panels.
Part 2: Header, letterhead and totals
Step 4: Show or hide header details
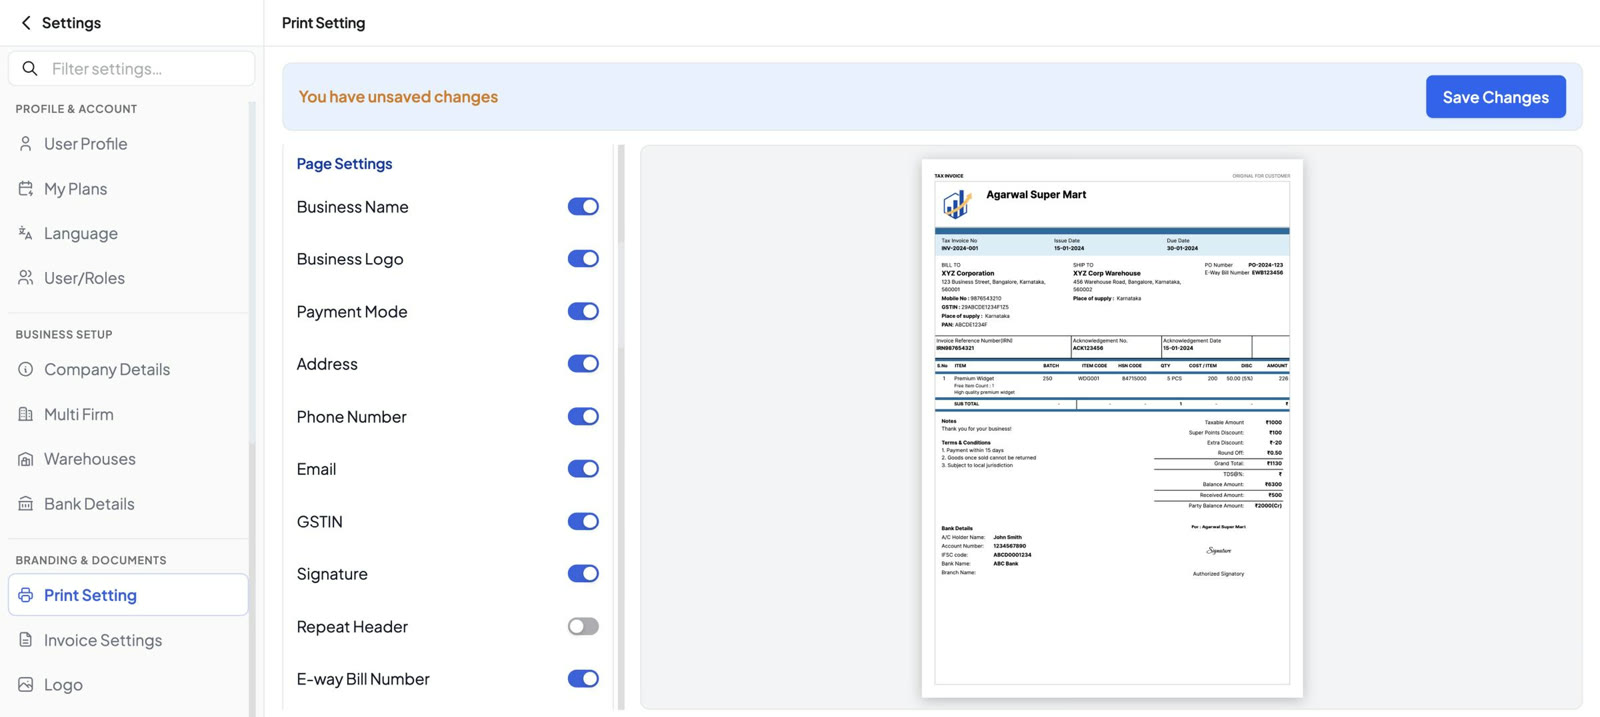
Under Page Settings, switch each item on or off: Business Name, Business Logo, Payment Mode, Address, Phone Number, Email, GSTIN, Signature, Repeat Header and E-way Bill Number.
Step 5: Set sizes and fonts
Choose the Logo Size and Company Name Size, then set the font size for each part of the invoice under Invoice font settings: business name, party details, invoice heading, item table, totals, footer and more. Reset to Default undoes these.
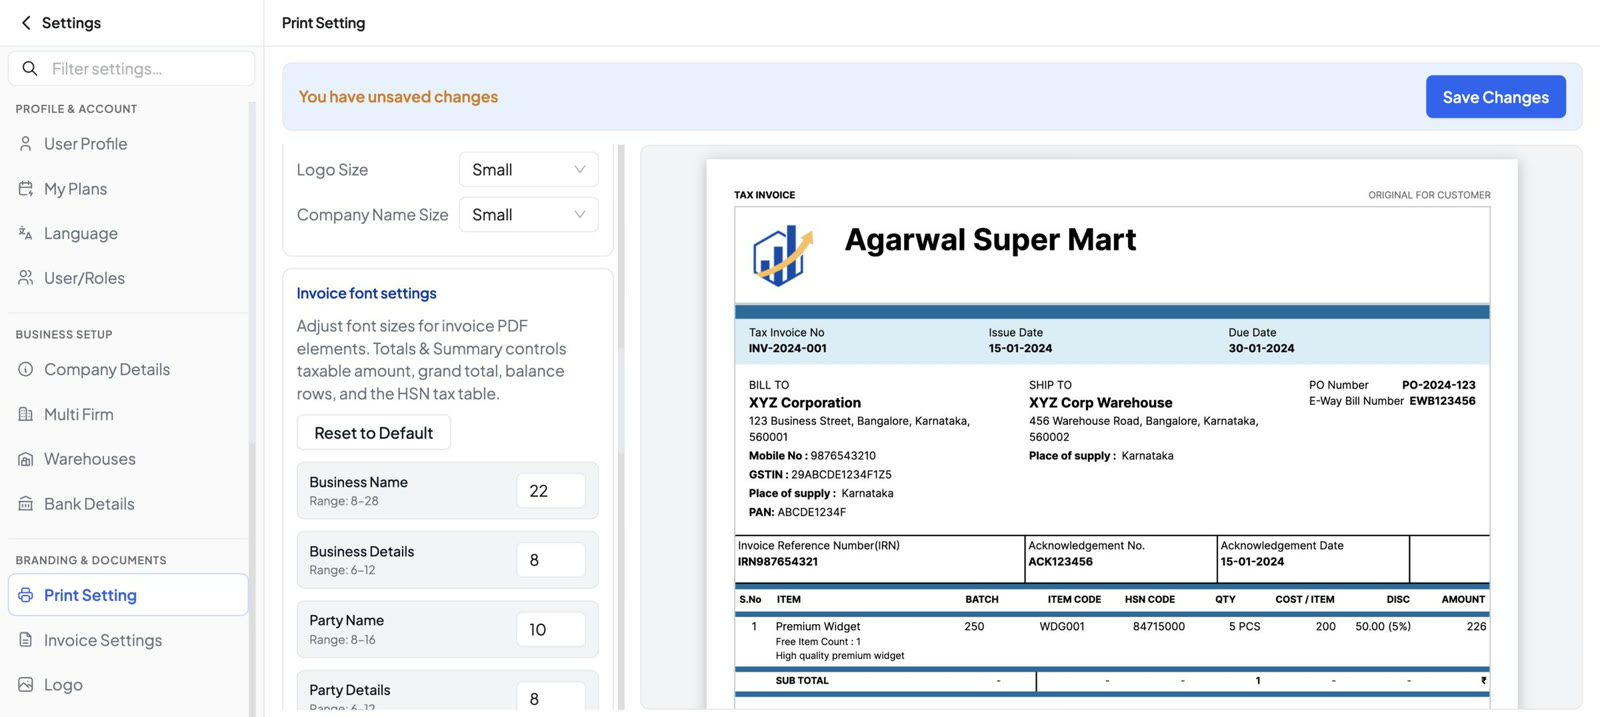
Step 6: Print on a pre-printed letterhead
Turn off Business Name and Business Logo (and anything else already printed on your letterhead). Then enter Header and Footer space in millimetres under Header & Footer Space (mm). The invoice now starts below your letterhead.
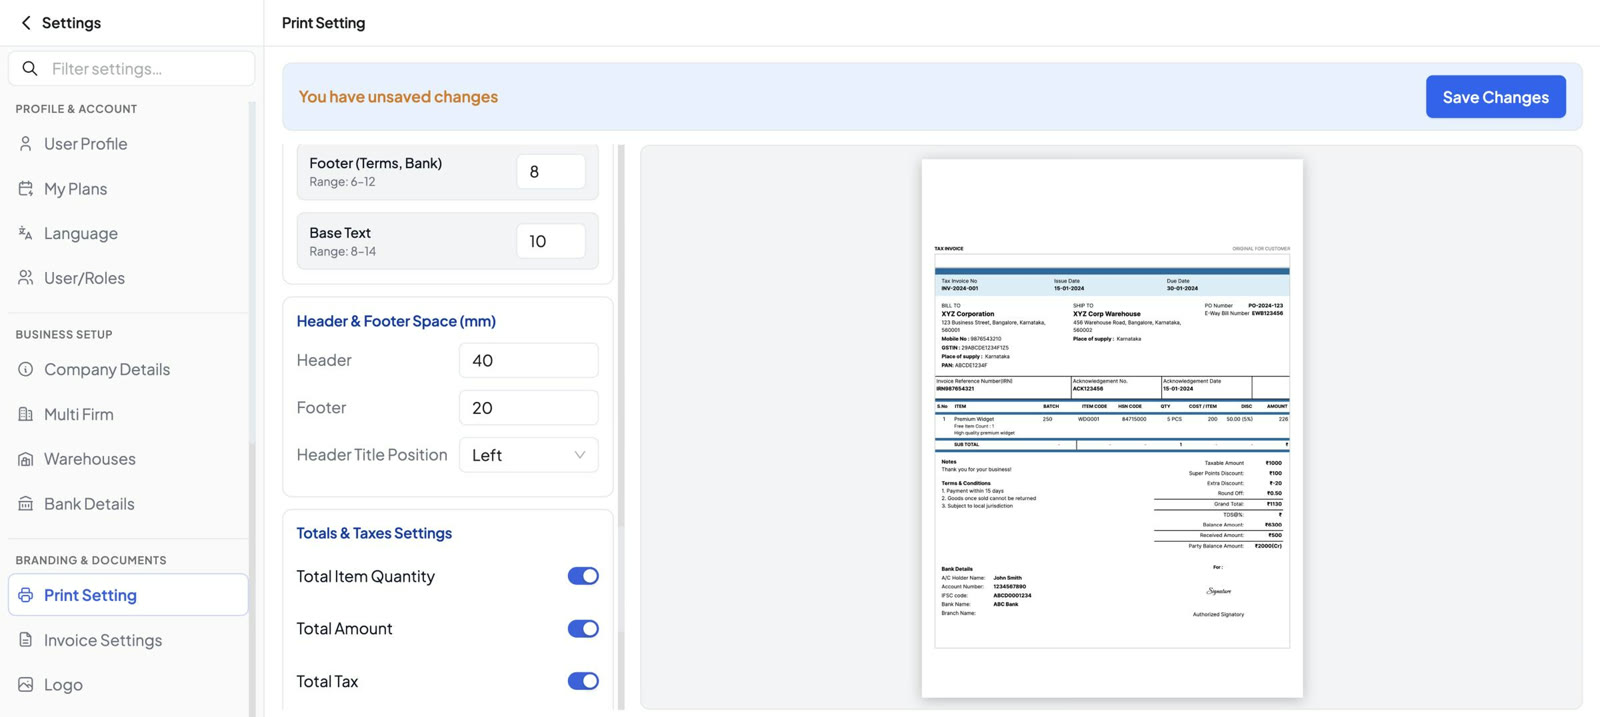
Step 7: Choose totals, terms and notes
Under Totals & Taxes Settings, choose which rows print: Total Item Quantity, Total Amount, Total Tax, Balance Amount, You Saved and Loyalty Point. Under Footer Settings, choose Description, Terms & Conditions and Business Notes. Click Save Changes.
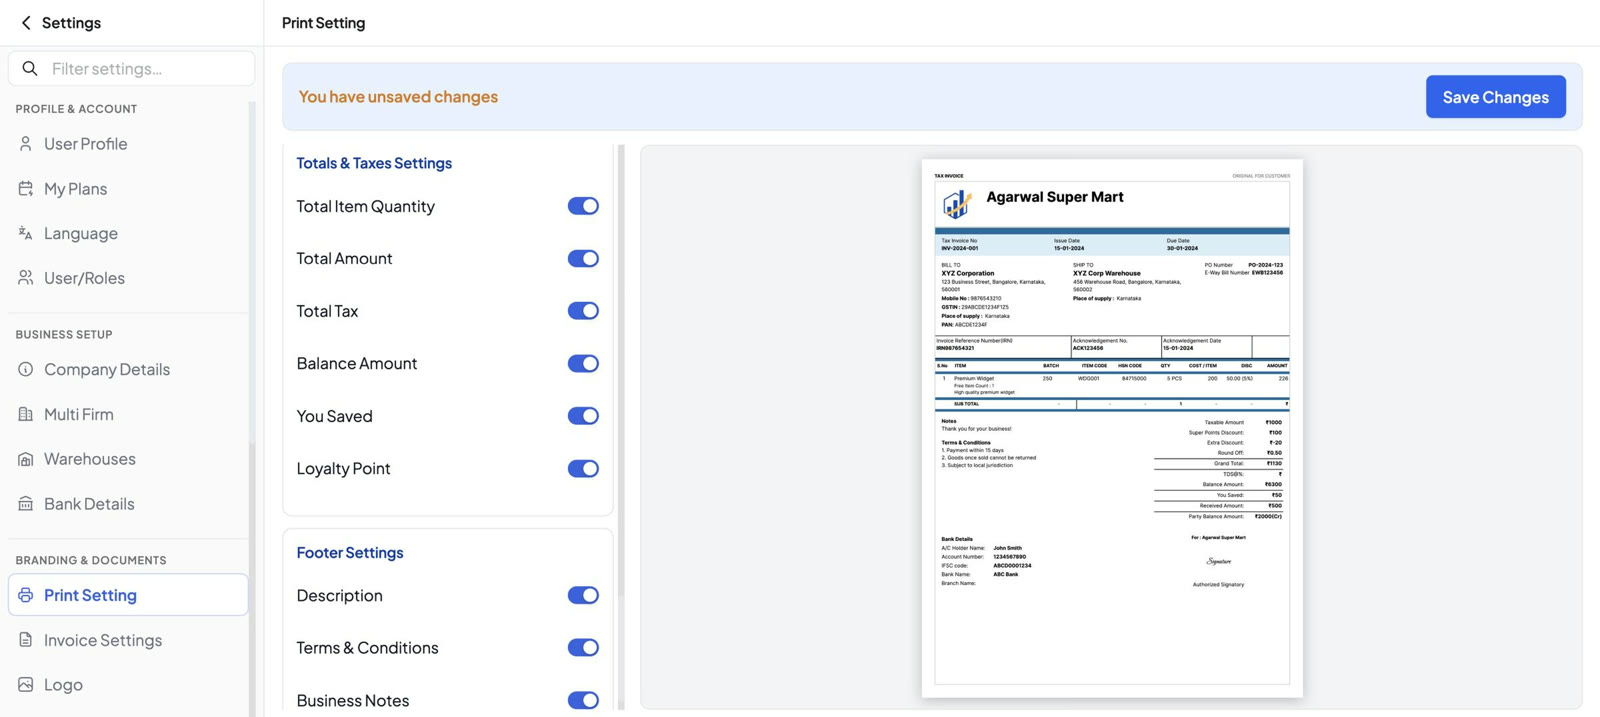
Part 3: Item columns
Step 8: Show or hide columns
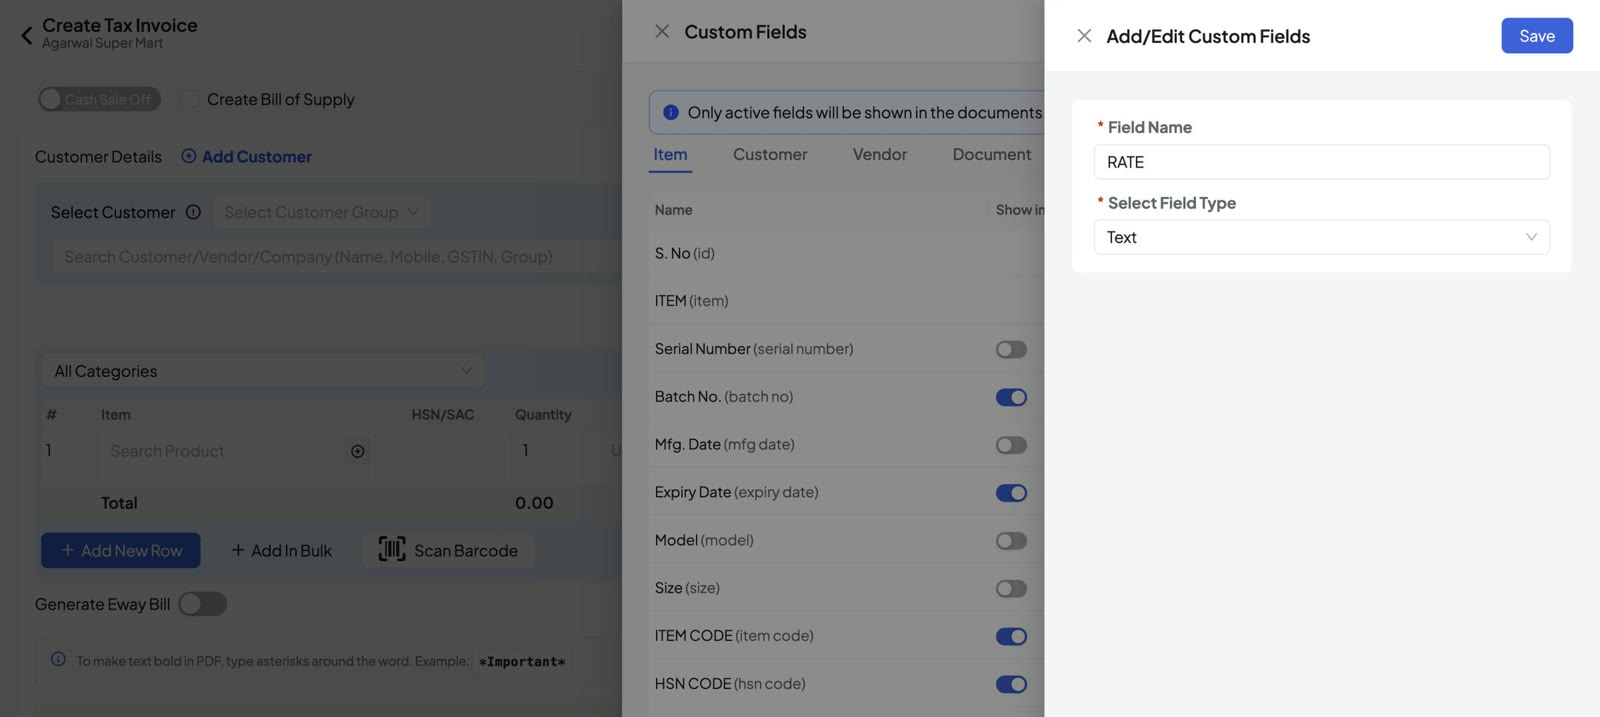
Open Create Tax Invoice and click Custom Headers (top right). On the Item tab, use Show in PDF to print or hide a column. For example: Batch No. and Expiry Date for a pharmacy, Size for garments, Serial Number and Model for electronics.
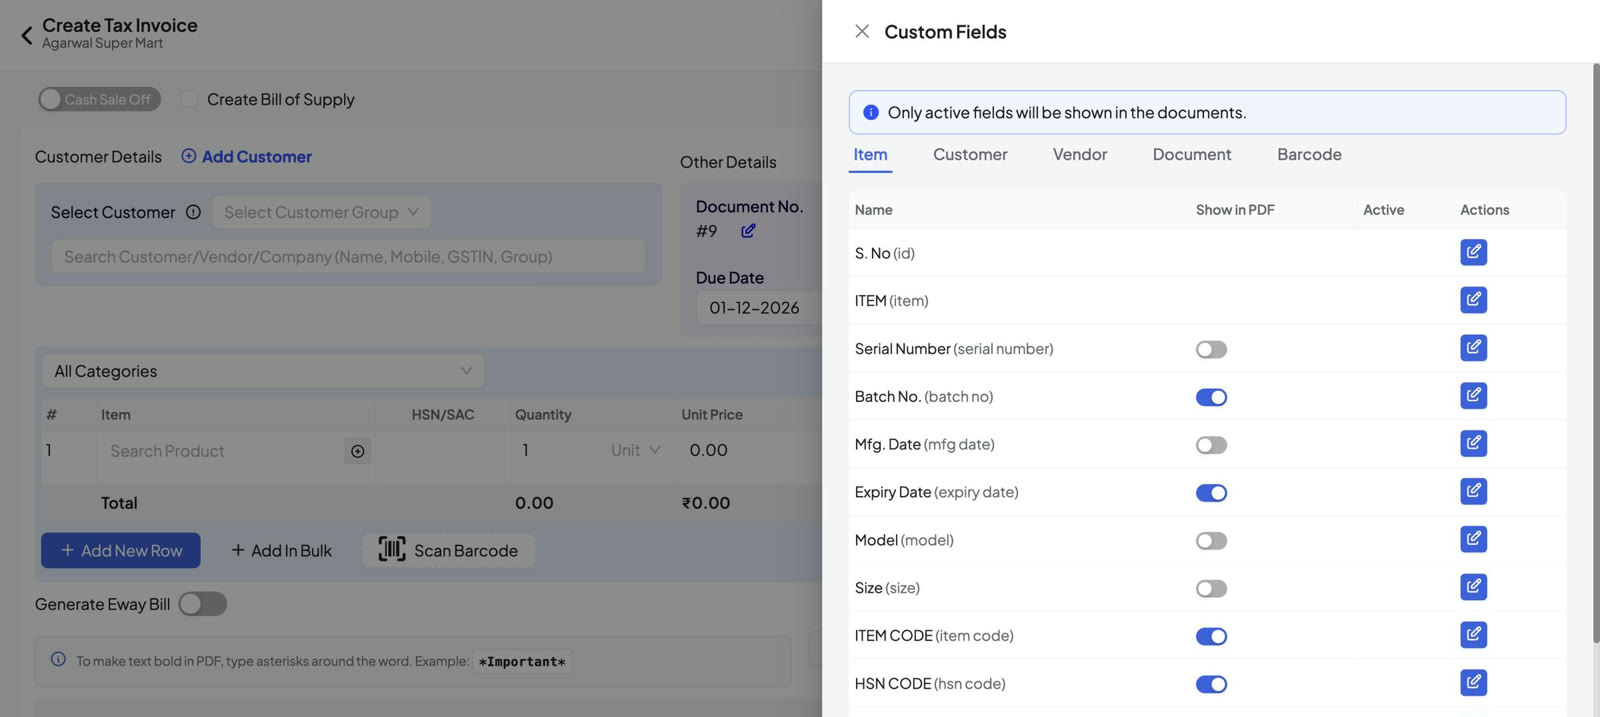
Step 9: Rename a column
Click the blue edit button next to a column, type the new Field Name and click Save. Here, COST / ITEM becomes RATE.
Step 10: Change the column order
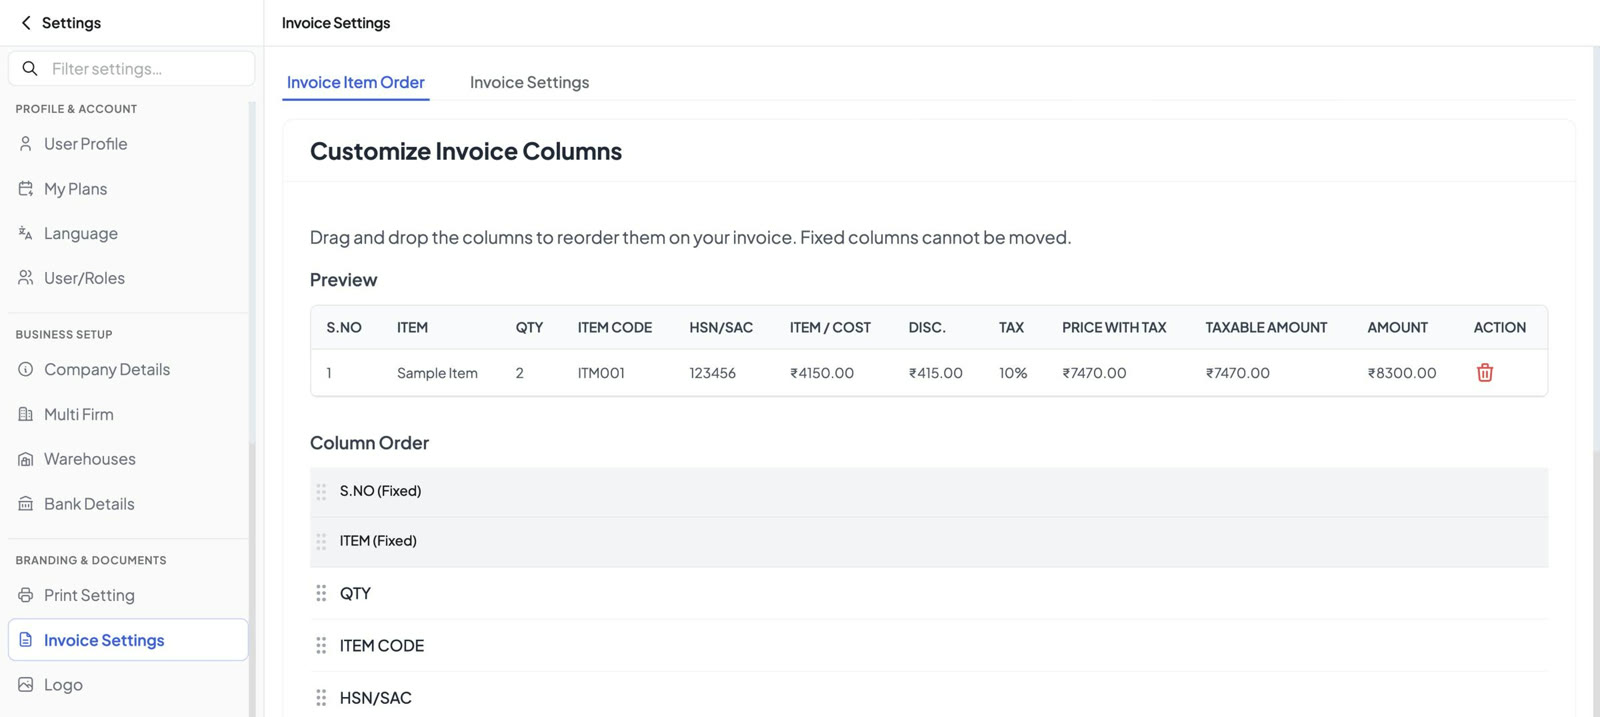
Go to Settings › Invoice Settings › Invoice Item Order. Drag columns up or down (S.NO, ITEM, AMOUNT and ACTION are fixed), check the preview table, then click Save Order.
Part 4: Your own fields
Step 11: Add fields for the whole bill
In Custom Headers, open the Document tab. Click a Recommended Field (Vehicle No, PO Number, Challan No, Delivery Date, Sales Person, Dispatch Number, E-way Bill No) or New Custom Field. For each field choose Active, Required and Show in PDF. The field appears on the invoice form straight away.
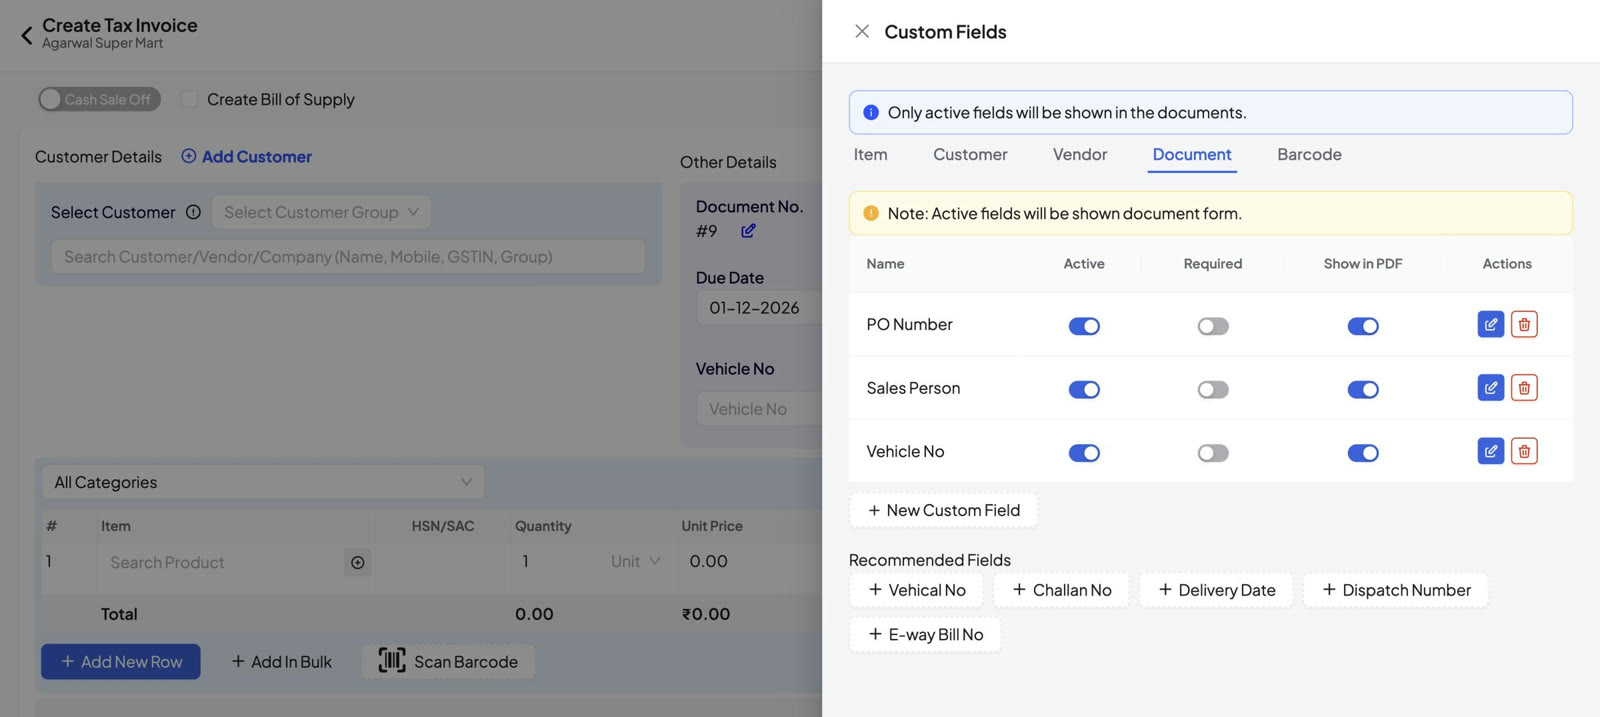
Note: a newly added recommended field may start with Required on, which means every invoice must have it filled. Turn it off if the field is optional for you. The Customer and Vendor tabs work the same way, for fields like PAN, Aadhaar or Contact person.
Step 12: Add licence numbers to the header
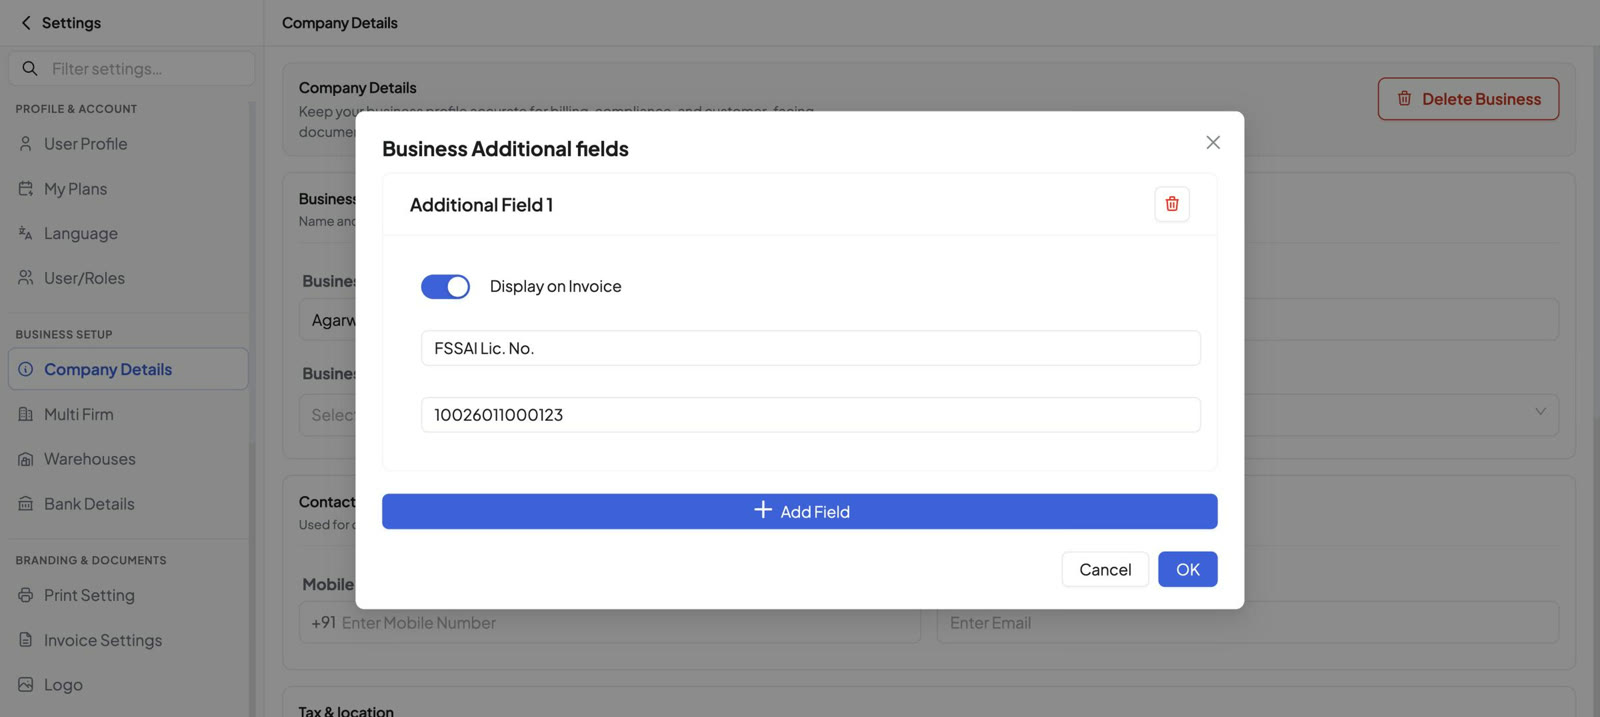
Go to Settings › Company Details and click Additional Fields. Click Add Field, enter a name (for example FSSAI Lic. No.) and its value, turn on Display on Invoice, click OK and then Save & Update.
Part 5: Wording and numbering
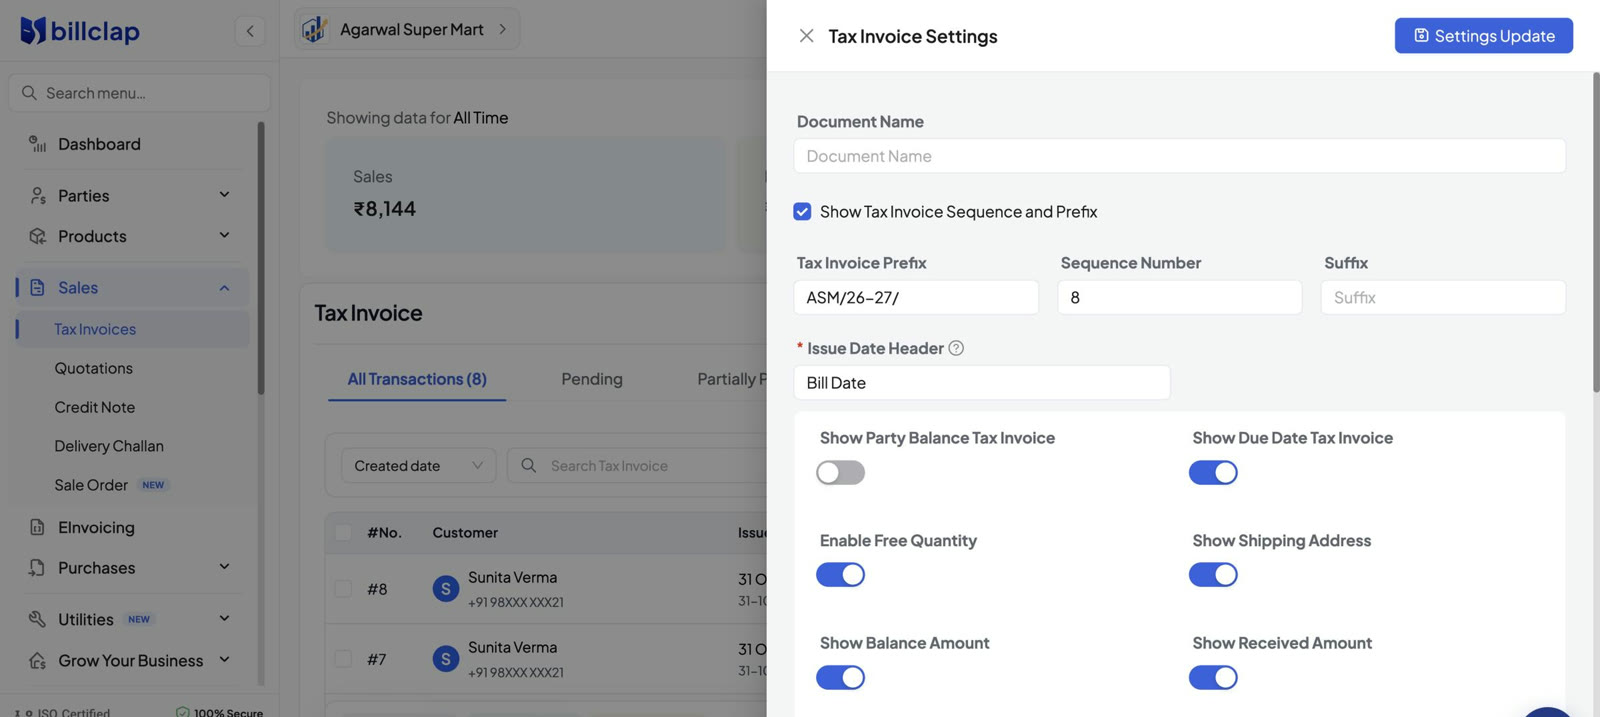
Step 13: Tax Invoice Settings
On Sales › Tax Invoices, click Tax Invoice Settings. Here you can:
- Change the Document Name printed at the top.
- Tick Show Tax Invoice Sequence and Prefix and set a Prefix, Sequence Number and Suffix (for example ASM/26-27/9).
- Rename the date label with Issue Date Header (for example Bill Date).
- Switch on or off Party Balance, Due Date, Shipping Address, Balance Amount, Received Amount, Free Quantity, Taxable Amount, Round Off and more.
Click Settings Update to save.
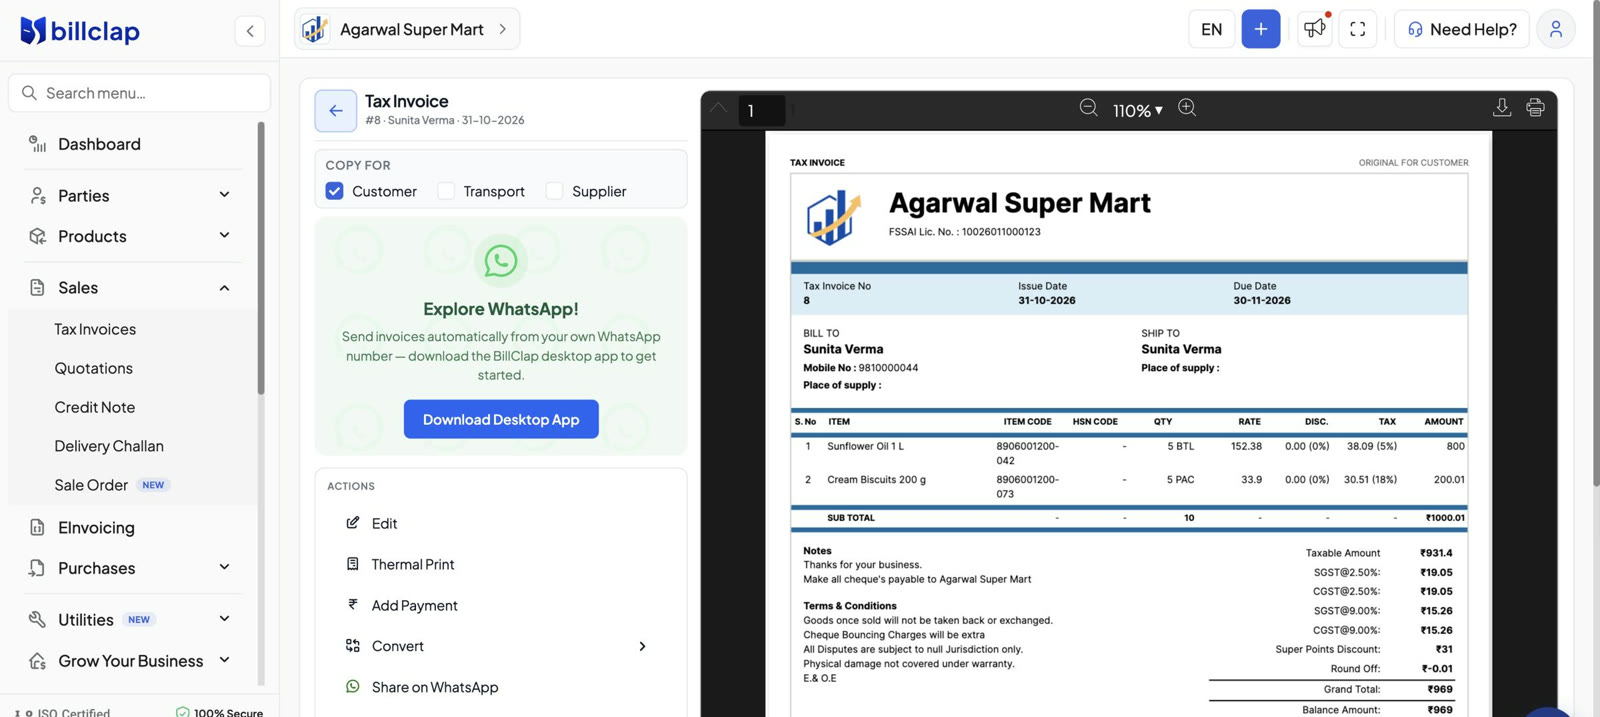
The result
Here is the same invoice after the changes: the Modern template in blue, the FSSAI number in the header, the RATE column and You Saved in the totals.
Ideas by business
- Pharmacy: Batch No. and Expiry Date columns, Drug Licence number, Medical template.
- Garments and footwear: Size column.
- Electronics and mobiles: Serial Number and Model columns, warranty in Terms & Conditions.
- Transport and distribution: Vehicle No, Challan No and Dispatch Number fields.
- Grocery and kirana: FSSAI licence number, You Saved in the totals.
Related: Change your invoice template and colour · Adding notes and terms · Print on A4, A5 and thermal printers